Last Updated on November 16, 2025
To replace a lawn mower pull cord, follow these steps: First, remove the recoil assembly cover and pull out the old cord. Then, attach the new cord to the recoil pulley, wind it around, and secure the end.
Finally, reattach the recoil assembly cover, and your lawn mower is ready for use! Whether your pull cord has snapped or is simply worn out, replacing it is a straightforward process that can be done with basic tools and a little bit of patience.
Read on to learn how to replace a lawn mower pull cord and get your mower running smoothly again.

Credit: www.gardentoolexpert.com
The Importance Of A Working Pull Cord
Understanding the importance of a working pull cord is essential for replacing a lawn mower pull cord. Here’s a simple guide on how to get the job done without any hassle.
Significance Of A Properly Functioning Pull Cord
A lawn mower’s pull cord is a small yet crucial component that enables the machine to start effortlessly. Understanding the importance of a working pull cord not only ensures smooth operation but also saves you from potential frustration and inconvenience.
Let’s delve into the significance of a properly functioning pull cord:
- Quick start: A functional pull cord allows for easy and fast starting of your lawn mower. With a smooth pull, the engine ignites instantly, eliminating any delays in getting your outdoor tasks done.
- Reliable operation: A working pull cord ensures the reliability of your lawn mower. You can confidently rely on it to start smoothly every time you need to mow your lawn or carry out any other yard maintenance tasks.
- Effortless maintenance: When your pull cord is in good condition, you can easily perform maintenance tasks, such as cleaning or changing spark plugs, without any hassle. A broken pull cord can make simple maintenance tasks unnecessarily complicated.
- Enhanced safety: A properly functioning pull cord is crucial for your safety. It ensures that you have full control over your lawn mower’s startup process, preventing any unexpected or dangerous situations.
Identifying Signs Of A Broken Pull Cord
Sometimes, it becomes evident that your pull cord is broken or needs replacement. By recognizing the signs early on, you can take necessary action to ensure uninterrupted use of your lawn mower. Here are some indicators that your pull cord may be damaged:
- Fraying or tearing: If you notice fraying or tearing on the edges of your pull cord, it’s a clear sign that replacement is required. Such damage weakens the cord’s structure, making it prone to breakage during operation.
- Failure to retract: A pull cord that fails to retract fully is another sign of a problem. This could be due to a broken recoil spring or tangled cord within the housing mechanism, indicating the need for repair or replacement.
- Snapping or resistance: When you experience snapping or excessive resistance while pulling the cord, it indicates that the internal components or the cord itself may be damaged. Ignoring these signs can lead to more severe issues and even render your lawn mower inoperable.
Remember, it’s essential to address the issues promptly and not delay the replacement of a broken pull cord.
Importance Of Timely Replacement
A timely replacement of a broken pull cord is vital for ensuring a well-functioning lawn mower and avoiding unnecessary complications down the line. Neglecting the need for replacement can lead to various issues, such as:
- Inconvenience: A broken pull cord can leave you unable to start your lawn mower when you need it the most, causing disruption to your yard maintenance routine.
- Further damage: If you continue using a lawn mower with a broken pull cord, it can cause additional damage to the internal components or the recoil mechanism, resulting in costly repairs or even rendering the machine unusable.
- Safety risks: Operating a lawn mower with a malfunctioning pull cord can pose safety hazards, as it may lead to unexpected or uncontrolled engine starts. Additionally, a broken pull cord can cause accidents if it gets tangled or hampers the mower’s overall functionality.
By promptly replacing a broken pull cord with a new one, you not only ensure the continued smooth operation of your lawn mower but also increase its lifespan, saving both time and money in the long run.
Preparing For The Replacement Process
Replacing a lawn mower pull cord can be a simple process. With proper preparation, you can easily replace the cord and ensure that your lawn mower is back in working order in no time.
Replacing a lawn mower pull cord can seem intimidating at first, but with the right tools, a safe environment, and proper precautions, it can be a straightforward task. Before diving into the replacement process, it’s important to gather the necessary tools and materials.
Additionally, ensuring a safe working environment and disconnecting the spark plug are crucial steps to take. Let’s break it down further.
Gathering Necessary Tools And Materials:
- Adjustable wrench or socket set: To remove any necessary parts on the lawn mower.
- Replacement pull cord: Make sure it matches the specifications of your lawn mower model.
- Screwdriver: To help with disassembling and reassembling parts.
- Pliers: Useful for various tasks during the replacement process.
- Scissors: To cut the new pull cord to the required length.
- Duct tape or electrical tape: To secure the new cord and prevent fraying.
Ensuring A Safe Working Environment:
- Choose an open and well-lit area: This will make it easier to work on your lawn mower and prevent accidents.
- Clear the surroundings: Remove any obstacles like rocks, branches, or debris that could hinder your movement.
- Wear safety goggles and gloves: Protect your eyes from any flying debris and ensure a secure grip while handling tools.
- Use a stable work surface: Place your lawn mower on a flat and stable surface to prevent it from tipping over during the repair process.
Disconnecting The Spark Plug:
- Locate the spark plug: It is usually found at the side or top of the lawn mower’s engine.
- Clean the area around the spark plug: Remove any dirt or debris that might interfere with the unplugging process.
- Disconnect the spark plug wire: Firmly grip the rubber boot and pull it straight off the spark plug.
- Move the wire away: After disconnecting, make sure the spark plug wire is kept away from the spark plug to prevent accidental engine start-up.
By following these steps and adhering to proper safety precautions, you will be well-prepared to replace a lawn mower pull cord. Remember to refer to your lawn mower’s user manual for any specific instructions related to your model. With a little patience and focus, you’ll have your lawn mower up and running in no time.
Step-By-Step Guide To Replacing A Lawn Mower Pull Cord
Learn how to replace a lawn mower pull cord with this step-by-step guide. Follow the instructions carefully to ensure a smooth replacement process for your damaged pull cord.
Has your lawn mower pull cord snapped? Don’t worry, it’s a common issue that can easily be fixed at home. In this step-by-step guide, we will walk you through the process of replacing a lawn mower pull cord so that you can get your mower up and running again in no time.
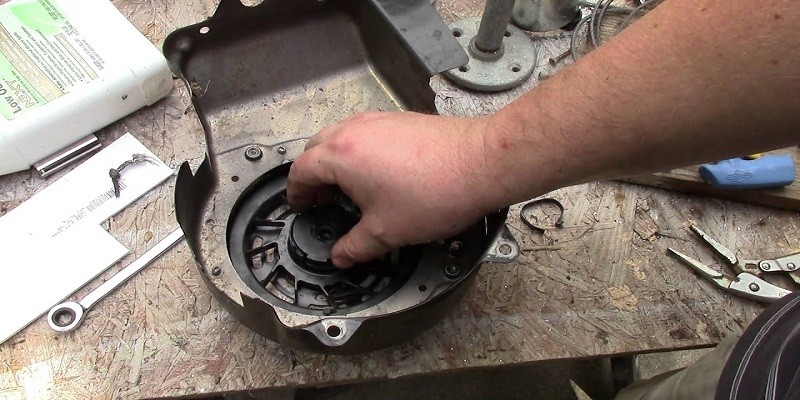
Removing The Starter Assembly Cover:
To access the pull cord mechanism, you first need to remove the starter assembly cover. Here’s how:
- Locate the screws or bolts securing the cover and use the appropriate tool to loosen and remove them.
- Carefully lift off the cover and set it aside in a safe place.
- Take note of the position of any springs or other components that may be attached to the cover.
Assessing The Condition Of The Pulley And Recoil Spring:
Before proceeding, it’s important to inspect the pulley and recoil spring to ensure they are in good condition. Follow these steps:
- Check the pulley for any signs of damage or wear. If it is cracked or broken, it will need to be replaced.
- Examine the recoil spring for any stretching or damage. A damaged spring should also be replaced.
- Lubricate both the pulley and recoil spring if necessary, using a suitable lubricant.
Detaching The Old Pull Cord:
Now it’s time to remove the old, broken pull cord. Follow these instructions:
- Locate the knot or handle at the end of the pull cord. Untie the knot if necessary.
- Gently pull the cord until it is fully extended from the pulley, being careful not to damage any surrounding components.
- Once the cord is fully extended, cut it off close to the pulley using a pair of scissors or a utility knife.
Measuring And Cutting The Replacement Cord:
With the old cord removed, it’s time to measure and cut the new pull cord. Here’s how to do it:
- Measure the length of the old cord and add a few inches for allowance.
- Cut a new length of pull cord to the measured size.
- Use a lighter or match to melt the ends of the cord slightly to prevent fraying.
Securing The New Cord To The Pulley And Recoil Spring:
Now it’s time to attach the new pull cord to the pulley and recoil spring. Follow these steps:
- Locate the small hole or slot on the pulley and thread one end of the cord through it.
- Tie a secure knot at the end of the cord to prevent it from slipping out of the pulley.
- Wind the cord around the pulley in the same direction as the original cord, ensuring it is snugly wound.
- Attach the other end of the cord to the recoil spring using a knot or by hooking it onto the spring.
Reassembling The Starter Assembly Cover:
With the new pull cord securely attached, it’s time to put the starter assembly cover back on. Here’s what to do:
- Position the starter assembly cover back onto the mower, aligning it with the mounting points.
- Tighten the screws or bolts to securely fasten the cover in place.
- Ensure that any springs or other components are properly positioned and attached.
Testing The Functionality Of The New Pull Cord:
Before calling it a success, you need to test the functionality of the new pull cord. Follow these steps:
- Give the cord a gentle pull to make sure it extends smoothly and retracts properly.
- Repeat this process a few times to ensure consistent performance.
- If the cord doesn’t retract or seems to have any issues, double-check your installation and make any necessary adjustments.
And there you have it! By following this step-by-step guide, you can easily replace a lawn mower pull cord and get your mower back in action. Happy mowing!
Troubleshooting Common Issues During The Replacement Process
Replacing a lawn mower pull cord can be a challenging task, but troubleshooting common issues can help make the process smoother. This guide provides step-by-step instructions and easy-to-follow tips for a successful pull cord replacement.
Replacing a lawn mower pull cord can be a straightforward task, but sometimes unexpected issues arise. Here are some common problems you may encounter during the replacement process and how to troubleshoot them:
Recoil Spring Not Retracting Properly
The recoil spring is responsible for retracting the pull cord after it has been pulled. If the spring is not retracting properly, there are a few things you can check:
- Ensure that the spring is lubricated and free from debris or damage. Clean the spring and apply lubricant if necessary.
- Check the positioning of the spring. It should be securely attached to the housing and in the correct position.
- Examine the tension of the spring. If it feels loose or weak, it may need to be replaced.
Difficulty In Reassembling The Starter Assembly Cover
Putting the starter assembly cover back in place can sometimes be challenging. Follow these steps to overcome this issue:
- Double-check the alignment of the cover with the housing, making sure all the screw holes line up.
- Apply even pressure to the cover and housing to ensure a snug fit.
- If you’re still having trouble, try loosening the screws slightly before starting to attach the cover, then tighten them gradually once it is properly positioned.
Pull Cord Snapping Back Or Not Retracting Fully
If the pull cord snaps back abruptly or fails to retract fully, consider the following troubleshooting tips:
- Inspect the recoil spring for damage or misalignment. Replace or readjust the spring if necessary.
- Ensure that the pulley is functioning properly and not obstructed in any way. Remove any debris or obstructions that may be hindering its movement.
- Check the condition of the pull cord itself. If it is frayed or worn, replace it with a new one that is compatible with your lawn mower.
Pull Cord Getting Stuck Or Jammed
Dealing with a pull cord that gets stuck or jammed can be frustrating, but the following steps should help resolve the issue:
- Check for any tangled or knotted sections of the pull cord. Untangle or unknot it to ensure smooth operation.
- Inspect the pulley and housing for debris or obstructions that may be causing the jamming. Clean or remove any debris as needed.
- Lubricate the pulley and other moving parts with a silicone-based lubricant to facilitate smooth movement.
Remember, troubleshooting these common issues during the replacement process can help you successfully replace a lawn mower pull cord. By following these steps, you’ll soon have your mower up and running again.
Regular Maintenance Tips For A Lawn Mower Pull Cord
Maintaining your lawn mower pull cord is essential for smooth operation. To replace a worn-out pull cord, follow these steps: unscrew the rewind assembly cover, remove the old cord, thread and knot the new cord, wind it back onto the assembly, and reattach the cover.
Keep your mower in top shape with regular maintenance.
Inspecting the pull cord for wear and tear:
Use these simple steps to inspect the pull cord and ensure it is in proper working condition:
- Gently pull the cord outward to expose it fully.
- Check for any signs of fraying, wear, or breakage in the cord.
- Look for any dirt, debris, or tangled parts along the cord.
- Examine the cord’s connection to the handle and recoil spring for any damage or loose parts.
- If you notice any issues with the pull cord, it may be time for a replacement.
Cleaning and lubricating the recoil spring:
Following these steps will help maintain the recoil spring and ensure smooth functioning:
- Remove the pull cord cover.
- Inspect the recoil spring for any visible dirt, dust, or debris.
- Clean the spring using a soft brush or cloth to remove any accumulated grime.
- Apply a light coat of lubricant to the spring to reduce friction.
- Ensure the spring moves freely without any stiffness or resistance.
- Reassemble the pull cord cover securely.
Replacing the pull cord at regular intervals:
It is important to replace the pull cord periodically to avoid unexpected breakdowns:
- Remove the old pull cord by detaching it from the handle and recoil spring.
- Measure and cut a new cord of appropriate length, ensuring it matches the old cord.
- Thread the new cord through the recoil spring and handle, securing it tightly.
- Wind the cord around the recoil spring, keeping tension on it.
- Reattach the handle to the cord, making sure it is securely fastened.
- Test the new pull cord by giving it a few gentle pulls to ensure proper functioning.
Avoiding excessive force when starting the mower:
Following these tips will help prevent damage and prolong the lifespan of your pull cord:
- Grasp the handle firmly, ensuring a secure grip.
- With a smooth and fluid motion, pull the cord straight out and away from the mower.
- Avoid jerking or yanking the cord forcefully, as it may lead to cord breakage or damage.
- Take care not to overtighten the recoil spring, as excessive tension can strain the pull cord.
- If the mower does not start after a few attempts, troubleshoot other potential issues to avoid unnecessary strain on the pull cord.
Regular maintenance of your lawn mower’s pull cord is essential to ensure smooth and hassle-free operation. By inspecting the cord for wear and tear, cleaning and lubricating the recoil spring, replacing the pull cord when necessary, and using proper techniques when starting the mower, you can extend the life of your pull cord and keep your lawn mower running efficiently.
Frequently Asked Questions On How To Replace A Lawn Mower Pull Cord?
Is It Easy To Fix A Pull Cord On A Lawn Mower?
Fixing a pull cord on a lawn mower is easy. Just follow these steps: remove the housing, thread the new cord, and reassemble.
How Do You Fix A Broken Pull Cord On A Lawnmower?
To fix a broken pull cord on a lawnmower, follow these steps: 1. Disconnect the spark plug wire to ensure safety. 2. Remove the starter assembly cover by unscrewing the bolts. 3. Inspect the pull cord for any damage or wear.
4. If the cord is broken, cut off the frayed end and tie a knot at the handle. 5. Wind the new cord around the starter pulley and secure it with a knot. 6. Reinstall the starter assembly cover and tighten the bolts.
7. Reconnect the spark plug wire and test the pull cord. Remember to always take caution and consult your lawnmower’s manual for specific instructions.
Can A Lawn Mower Cord Be Replaced?
Yes, a lawn mower cord can be replaced easily without much hassle or professional assistance.
How Do You Replace A Briggs And Stratton Pull Cord?
To replace a Briggs and Stratton pull cord, follow these steps: 1. Remove the housing cover by unscrewing the bolts. 2. Locate the starter pulley and disengage the old cord. 3. Attach the new cord to the pulley and wind it tightly.
4. Feed the cord through the housing and tie a knot at the handle. 5. Reassemble the housing cover, ensuring all bolts are tightened securely.
How Do You Replace A Lawn Mower Pull Cord?
To replace a lawn mower pull cord, you need to disconnect the spark plug wire, remove the starter assembly, and replace the cord by winding it tightly around the pulley.
Conclusion
To sum up, replacing a lawn mower pull cord doesn’t have to be a daunting task. By following the step-by-step guide mentioned above, you can easily replace a worn-out pull cord and have your lawn mower running smoothly again. Remember to always prioritize safety and use the appropriate tools for the job.
Regular maintenance and occasional replacement of parts like the pull cord will keep your lawn mower in good working condition for years to come. Happy mowing!