Last Updated on November 16, 2025
To clean a lawn mower carburetor, follow these steps precisely: disconnect the spark plug wire, remove the carburetor bowl and gasket, clean the bowl and jet with carburetor cleaner, and reassemble the carburetor. Now, here is a comprehensive guide on how to clean a lawn mower carburetor.
A well-maintained carburetor is essential for the smooth functioning of your lawn mower. Over time, dirt, debris, and old fuel can clog the carburetor, resulting in poor performance. Cleaning the carburetor can resolve these issues and improve fuel efficiency. In this guide, we will walk you through the steps to clean a lawn mower carburetor effectively.
By following these instructions, you can keep your lawn mower running at its best and ensure a clean and healthy carburetor.
The Importance Of Cleaning The Carburetor
Cleaning the carburetor of your lawn mower is essential for its proper functioning. This task can be accomplished by following a few simple steps, ensuring optimal performance and longevity of your machine.
A well-maintained lawn mower carburetor is crucial for optimal performance. By understanding the importance of regularly cleaning the carburetor, you can ensure that your lawn mower functions at its best. Here are some key points to consider:
- Enhanced Fuel Efficiency: Over time, debris, dirt, and varnish can build up in the carburetor, obstructing the flow of fuel and air. This can lead to a decrease in fuel efficiency, causing your lawn mower to consume more fuel than necessary. Cleaning the carburetor removes these deposits, enabling efficient fuel combustion and ultimately saving you money on fuel costs.
- Smooth and Consistent Engine Performance: A dirty or clogged carburetor can disrupt the air-fuel mixture required for combustion. This can result in rough idling, stalling, or inconsistent engine performance. Regular cleaning helps maintain proper air and fuel flow, ensuring smooth operation and consistent power output from your lawn mower.
- Prevention of Costly Repairs: Neglecting carburetor maintenance can lead to more serious issues down the line. A dirty carburetor can cause engine misfires, overheating, or even permanent damage. By cleaning the carburetor regularly, you can prevent these potentially costly repairs and extend the lifespan of your lawn mower.
- Improved Starting and Idling: A clean carburetor ensures easy starting and smooth idling of your lawn mower. When the carburetor is free from debris, the engine receives the optimal amount of fuel and air, making it easier to start the mower and preventing it from stalling during idle periods.
- Maintaining Warranty and Manufacturer Requirements: Many lawn mower manufacturers require regular maintenance, including carburetor cleaning, to keep the warranty valid. By adhering to these requirements, you can ensure that any warranty claims remain valid and your lawn mower remains covered.
Regular carburetor cleaning is crucial for maintaining the overall performance of your lawn mower. By taking the time to clean this vital component, you can enhance fuel efficiency, ensure smooth engine operation, prevent costly repairs, and maintain warranty requirements.
Gathering The Necessary Tools And Materials
To clean a lawn mower carburetor, start by gathering the necessary tools and materials. This includes a socket wrench set, carburetor cleaner, gloves, and a clean cloth.
To properly clean a lawn mower carburetor, you’ll need a few essential tools and materials. These items will help make the cleaning process more efficient and effective. Here’s a list of the tools you’ll need:
- Screwdriver set: Different sizes of screwdrivers will be required to remove screws and access the carburetor.
- Wrenches: Having a set of wrenches on hand will enable you to disconnect fuel lines and other components.
- Carburetor cleaner: This specialized cleaner is designed to remove dirt, debris, and varnish buildup from the carburetor.
- Compressed air: Using compressed air will help dislodge stubborn dirt particles and blow them out of the carburetor.
- Safety goggles: It’s essential to protect your eyes from any debris that may be dislodged during the cleaning process.
- Latex gloves: Wearing gloves will help keep your hands clean and protect them from any chemicals or fuel.
- Safety mat or tray: Having a designated workspace to catch any spills or drips will prevent any damage or mess.
- Replacement gaskets: It’s always a good idea to have some replacement gaskets on hand in case any get damaged during the cleaning process.
By gathering these tools and materials beforehand, you’ll be well-prepared to clean your lawn mower carburetor effectively and efficiently. Remember to prioritize safety and take the necessary precautions throughout the cleaning process.
Step-By-Step Instructions For Cleaning The Carburetor
Learn how to clean a lawn mower carburetor with step-by-step instructions. These easy-to-follow guidelines will help you keep your carburetor clean and ensure your lawn mower runs smoothly.
Disconnecting The Spark Plug And Preparing The Lawn Mower For Carburetor Cleaning:
Before you begin cleaning the carburetor, it’s important to disconnect the spark plug to ensure safety and prevent accidental ignition. Follow these steps to prepare the lawn mower for carburetor cleaning:
- Locate the spark plug, usually found near the engine on the lawn mower.
- Carefully remove the rubber boot that covers the spark plug terminal.
- Use a spark plug wrench to loosen and remove the spark plug.
- Once the spark plug is removed, make sure to keep it in a safe and clean place.
- With the spark plug disconnected, you can now proceed to clean the carburetor.
Removing The Carburetor From The Lawn Mower:
To clean a lawn mower carburetor effectively, you’ll need to remove it from the mower. Here’s how you can do it:
- Locate the carburetor, which is typically positioned near the engine.
- Identify the fuel line connected to the carburetor and gently disconnect it.
- Use a wrench or screwdriver to remove any bolts, screws, or clips securing the carburetor to the engine.
- Carefully separate the carburetor from the engine, ensuring you keep track of any attached parts or gaskets.
- Place the removed carburetor in a clean and well-ventilated area for further cleaning.
Disassembling The Carburetor And Identifying Its Various Components:
Now that you have the carburetor removed, it’s time to disassemble it and identify its different components. Follow these steps:
- Use a wrench or screwdriver to carefully remove the screws or bolts holding the carburetor together.
- Gently separate the various parts of the carburetor, such as the bowl, float, needle valve, jets, and gaskets.
- Take note of the order and orientation of each part for reassembly later.
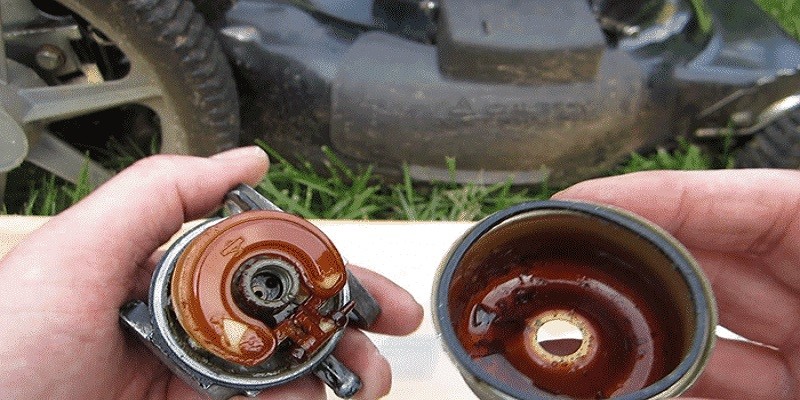
- Inspect the components for any signs of dirt, debris, or clogs that may be affecting the carburetor’s performance.
Cleaning The Carburetor Components With The Appropriate Carburetor Cleaner:
To ensure proper cleaning of the carburetor components, it’s essential to use the appropriate carburetor cleaner. Follow these steps:
- Start by soaking the disassembled parts in a container filled with a carburetor cleaner.
- Gently agitate the parts to loosen any dirt or debris.
- Use a brush or toothbrush to scrub away any stubborn buildup.
- Pay close attention to cleaning the small openings and jets to allow proper fuel flow.
- Rinse the cleaned parts with clean water and inspect them for any remaining debris.
Inspecting And Replacing Any Damaged Or Worn-Out Parts If Necessary:
While cleaning the carburetor, it’s important to inspect the components for any damage or wear. Look for the following:
- Cracked or damaged gaskets: Replace any gaskets that show signs of wear or damage.
- Worn-out or bent needles and float: If these components are damaged, they may need to be replaced.
- Clogged jets or fuel passages: Use a needle or small wire to clear any obstructions.
- Damaged or corroded carburetor body: If the carburetor body is severely damaged, you may need to consider replacing it.
Reassembling The Carburetor And Reinstalling It In The Lawn Mower:
With the carburetor components cleaned and inspected, it’s time to reassemble and reinstall the carburetor. Follow these steps:
- Refer to your notes or the carburetor diagram to correctly position each component in the right order.
- Carefully reattach the bowl, float, needle valve, jets, and gaskets.
- Use the appropriate screws or bolts to secure the carburetor parts together.
- Once the carburetor is fully assembled, it’s ready to be reinstalled on the lawn mower.
- Attach any fuel lines or connections that were previously disconnected.
- Secure the carburetor to the engine with the necessary bolts, screws, or clips.
Performing A Test Run To Ensure Proper Functioning Of The Carburetor:
After reassembling and reinstalling the carburetor, it’s important to perform a test run to ensure it’s working correctly. Follow these steps:
- Attach the spark plug back onto the lawn mower and ensure it is tightly secured.
- Reconnect the spark plug wire to the spark plug terminal.
- Refuel the lawn mower with fresh gasoline, ensuring it reaches the appropriate level.
- Start the lawn mower and let it run for a few minutes to allow the carburetor to adjust.
- Observe the lawn mower’s performance, ensuring smooth and consistent operation.
- Make any necessary adjustments to the carburetor settings if required for optimal performance.
By following these step-by-step instructions, you can effectively clean your lawn mower’s carburetor and ensure its proper functioning. Remember to prioritize safety, carefully clean each component, and inspect for any necessary replacements. With a clean carburetor, your lawn mower will run smoothly, providing you with a well-maintained and healthy lawn.
Identifying And Resolving Flooding Problems
To resolve flooding problems with a lawn mower carburetor, follow these steps: 1. Disconnect the spark plug wire. 2. Remove the air filter and carburetor cover. 3. Clean the carburetor with carburetor cleaner, ensuring all passages are clear. 4. Reassemble the carburetor and start the mower.
5. If the problem persists, consult a professional for further assistance.
It can be frustrating when your lawn mower carburetor gets flooded. This can lead to stalling, poor performance, and difficulty in starting the engine. However, identifying and resolving flooding problems in your lawn mower carburetor is not as complicated as it may seem.
In this section, we will explore the causes of a flooded carburetor and provide step-by-step instructions on troubleshooting and fixing the issue.
The Causes Of A Flooded Carburetor:
- Faulty or stuck float valve: A faulty or stuck float valve can prevent the carburetor from shutting off the fuel supply properly, leading to flooding.
- Blocked air vent: If the air vent in your carburetor becomes blocked, it can create a vacuum, causing an excessive amount of fuel to flow into the carburetor.
- Choke issues: A malfunctioning choke can result in too much fuel entering the carburetor, leading to flooding.
- Incorrect fuel mixture: Using the wrong fuel-to-air ratio can cause the carburetor to flood.
- Worn-out carburetor parts: Over time, certain components of the carburetor can wear out or become damaged, causing flooding issues.
Steps To Troubleshoot And Fix A Flooded Carburetor:
- Stop the engine: Turn off the engine and let it cool down before attempting any troubleshooting or repairs.
- Remove the air filter: Take off the air filter cover and remove the air filter element to access the carburetor.
- Inspect the float and float valve: Check the float and float valve for any damage or sticking. Ensure that the float moves freely and the float valve is clean.
- Check the air vent: Make sure the air vent is clear and not obstructed by debris.
- Inspect the choke: Check the choke mechanism to ensure it is operating correctly. Clean or replace any parts if necessary.
- Drain excess fuel: If the carburetor is flooded, carefully drain any excess fuel from the carburetor bowl using a drain plug or the fuel inlet.
- Clean or replace carburetor parts: If any parts of the carburetor are damaged or worn out, clean them thoroughly or replace them as needed.
- Reassemble the carburetor: Put everything back together in the reverse order of disassembly, ensuring proper alignment and connections.
- Adjust fuel mixture: If the fuel mixture was incorrect, adjust it according to the manufacturer’s recommendations.
- Start the engine: Once everything is reassembled, start the engine and observe if the flooding issue has been resolved. If not, further troubleshooting or professional assistance may be required.
By understanding the causes of a flooded carburetor and taking the necessary troubleshooting steps, you can keep your lawn mower running smoothly and efficiently.
Addressing Starting Issues
If your lawn mower is having starting issues, it may be due to a dirty carburetor. Follow this simple guide to learn how to clean your lawn mower carburetor and get your mower running smoothly again.
Having trouble starting your lawn mower? One of the common culprits behind starting issues is a clogged or malfunctioning carburetor. In this section, we will explore the reasons for difficulty in starting the lawn mower and provide troubleshooting tips specifically related to the carburetor.
Identifying The Reasons For Difficulty In Starting The Lawn Mower
When your lawn mower fails to start, it can be frustrating. However, understanding the possible causes can help you address the issue effectively. Here are some common reasons for starting problems with lawn mowers:
- Fuel-related issues: Insufficient fuel or contaminated fuel can prevent your lawn mower from starting. It’s important to check the fuel tank and make sure your fuel is fresh and clean.
- Spark plug problems: A worn-out or faulty spark plug can hinder ignition, leading to starting problems. Regularly inspect your spark plug and replace it if necessary.
- Airflow restrictions: Dirt, debris, or grass clippings can obstruct the airflow to the carburetor, affecting the engine’s ability to start. Ensure that the air filter is clean and free from blockages.
- Carburetor troubles: The carburetor is a crucial component responsible for mixing fuel and air properly. When the carburetor is dirty or damaged, it can disrupt the engine’s performance, resulting in starting difficulties.
Troubleshooting And Resolving Starting Problems Related To The Carburetor
If you suspect that your lawn mower’s starting issue is carburetor-related, here are some troubleshooting steps you can take to resolve the problem:
- Clean the carburetor: Start by removing the carburetor from the lawn mower and carefully cleaning it. Use a carburetor cleaner to remove any dirt or residue that may be obstructing the fuel flow.
- Inspect and replace parts: Check the carburetor’s components for signs of wear or damage. Replace any faulty or worn-out parts, such as gaskets, needles, or jets, as necessary.
- Adjust the carburetor settings: Ensure that the carburetor settings are correctly adjusted for optimal fuel-air mixture. Consult the lawn mower’s manual for specific instructions on adjusting the carburetor.
- Use fuel additives: Consider adding a fuel stabilizer or cleaner to the gas tank to prevent future carburetor issues. These additives help keep the fuel system clean and prevent the build-up of deposits.
By addressing starting issues related to the carburetor, you can effectively troubleshoot and resolve problems that hinder the smooth operation of your lawn mower. Remember to perform regular maintenance and clean the carburetor periodically to prevent potential starting issues in the future.
Dealing With Lean Or Rich Fuel Mixtures
When it comes to maintaining a clean lawn mower carburetor, it’s important to address lean or rich fuel mixtures. By understanding how to deal with these mixtures, you can ensure optimal performance and longevity for your lawn mower.
If your lawn mower carburetor is experiencing issues, such as running too rich or too lean, it can lead to poor performance and inefficient fuel consumption. Identifying the symptoms of lean or rich fuel mixtures and adjusting them for optimal performance is crucial.
Let’s explore the steps you can take to tackle this carburetor problem effectively.
Recognizing The Symptoms Of Lean Or Rich Fuel Mixtures In The Carburetor
A lean or rich fuel mixture can have noticeable effects on your lawn mower. Take note of the following symptoms, which can help you determine whether the fuel mixture is too lean or rich:
Lean Fuel Mixture:
- The engine may stall or hesitate during acceleration.
- It may also produce a popping sound from the exhaust.
- The engine may run hotter than usual.
- You may notice a decrease in power or overall performance of the lawn mower.
Rich Fuel Mixture:
- The engine may emit black smoke from the exhaust.
- The spark plug may become fouled, resulting in a misfire or rough running.
- The lawn mower may experience excessive fuel consumption.
- There might be a noticeable decrease in engine power or overall performance.
Adjusting The Fuel Mixture For Optimal Performance
Once you’ve determined whether the fuel mixture is lean or rich, it’s essential to make the necessary adjustments. Follow these steps to optimize the fuel mixture for better performance:
- Locate the carburetor: Identify the carburetor on your lawn mower. It is usually positioned near the engine and connected to the fuel line.
- Identify the adjustment screws: Most carburetors have two adjustment screws: the idle adjustment screw and the fuel mixture screw. The fuel mixture screw is the one you’ll need to focus on for this process.
- Access the fuel mixture screw: Use a screwdriver to access the fuel mixture screw. It is typically located on the side of the carburetor.
- Determine the initial position: Before making any adjustments, turn the fuel mixture screw gently clockwise until it is lightly seated. Then, turn it counterclockwise 1.5 turns to establish the initial position.
- Fine-tune the fuel mixture: With the engine running, slowly turn the fuel mixture screw clockwise or counterclockwise in small increments. Observe the engine’s response and listen for any changes in sound or performance.
- Achieve optimal performance: Continue adjusting the fuel mixture screw until you find the optimal point where the engine runs smoothly and powerfully. This point typically lies between the extremes of a lean and rich fuel mixture.
Remember, it’s essential to make small adjustments and test the engine’s performance after each one. Keep an ear out for any changes in the sound and monitor the lawn mower’s overall performance.
By recognizing the symptoms of lean or rich fuel mixtures and adjusting the fuel mixture accordingly, you can ensure that your lawn mower runs efficiently and delivers optimal performance during each use.
Regular Cleaning Schedule
To clean a lawn mower carburetor, follow these steps: disconnect the spark plug, remove the carburetor, disassemble it carefully, clean the parts with carburetor cleaner, reassemble it, and reconnect the spark plug. Regularly cleaning your carburetor maintains its performance and prolongs its lifespan.
Regularly cleaning the carburetor of your lawn mower is essential for its proper functioning and longevity. Setting a cleaning schedule will help ensure that the carburetor remains free from debris and buildup, allowing your lawn mower to perform at its best.
Follow these guidelines to establish a regular cleaning routine:
- Note the operating hours: Keep track of the number of hours you have used your lawn mower since the last carburetor cleaning. This will help you determine when it’s time for the next cleaning session.
- Inspect the air filter: Before each mowing session, inspect the air filter of your lawn mower. A clogged air filter can cause debris to enter the carburetor, leading to performance issues. Clean or replace the air filter as needed.
- Use ethanol-free or low-ethanol fuel: Ethanol in fuel can cause carburetor problems over time. Opt for ethanol-free or low-ethanol fuel to minimize the risk of carburetor buildup. This simple switch can prevent frequent cleanings and ensure a longer lifespan for your carburetor.
- Add a fuel stabilizer: When storing your lawn mower for an extended period, add a fuel stabilizer to the fuel tank. This prevents the fuel from deteriorating and clogging the carburetor during storage. Follow the manufacturer’s instructions for the appropriate amount of stabilizer.
- Inspect for debris: Regularly inspect the carburetor for any visible debris or buildup. Use a flashlight if needed to get a clear view. If you notice any dirt or gunk, it’s time for a cleaning.
- Remove the carburetor: If your lawn mower’s carburetor is removable, carefully detach it according to the manufacturer’s instructions. This will allow for a more thorough cleaning and easier access to hard-to-reach areas.
- Clean with carburetor cleaner: Use a quality carburetor cleaner to spray and clean all the components of the carburetor. Pay attention to the small passages and jets where debris tends to accumulate. Use a soft-bristle brush or toothbrush to gently scrub away stubborn dirt.
- Reassemble and test: After cleaning, reassemble the carburetor and ensure that all connections are secure. Start the lawn mower and let it run for a few minutes to check if it’s functioning properly. Monitor the engine performance to ensure smooth running.
By following a regular cleaning schedule, you can prevent carburetor issues and maintain the optimal performance of your lawn mower. Cleaning the carburetor at the recommended intervals will prolong its lifespan and keep your lawn looking pristine.
Preventive Measures
Learn how to clean a lawn mower carburetor effectively with preventive measures. Discover easy steps to ensure optimal performance and extend the lifespan of your equipment.
Tips For Preventing Carburetor Issues:
- Use clean fuel: Ensure that you always use clean, fresh fuel for your lawn mower. Dirty or contaminated fuel can clog the carburetor, leading to poor performance and potential damage. Consider using a fuel stabilizer to prevent fuel deterioration.
- Properly store the lawn mower: When you’re done using the lawn mower, don’t just leave it sitting around. Take the time to properly store it, especially during the winter months. Here are some essential steps to follow:
- Drain the fuel: Before storing your lawn mower, be sure to drain any remaining fuel from the tank. This helps prevent fuel deposits from forming in the carburetor.
- Clean the carburetor: Regularly check and clean the carburetor. Use a carburetor cleaner to remove any buildup or debris that may have accumulated. This will help maintain its proper functioning.
- Store in a dry place: Keep your lawn mower in a dry and well-ventilated area. Moisture can cause corrosion and damage to the carburetor.
- Use fuel stabilizer: Adding a fuel stabilizer to your fuel can help prevent carburetor issues. This additive helps keep the fuel fresh and prevents it from gumming up the carburetor.
- Clean or replace air filter: A dirty or clogged air filter can impact the performance of the carburetor. Regularly clean or replace the air filter to ensure optimal air flow to the engine.
- Regular maintenance: Don’t neglect regular maintenance of your lawn mower. Schedule regular tune-ups and inspections to catch any potential carburetor issues early on. This will help prevent major problems and costly repairs down the line.
- Avoid ethanol-blended fuel: Ethanol-blended fuels can cause issues with carburetors due to their corrosive nature. Try to opt for ethanol-free fuel whenever possible.
- Clean the mower after each use: After each mowing session, take the time to clean the mower thoroughly. Removing grass clippings and debris from the carburetor area will help prevent blockages and keep it running smoothly.
By following these preventive measures, you can keep your lawn mower carburetor in top shape and avoid unnecessary repairs. Regular maintenance, using clean fuel, and proper storage are the key to ensuring optimum performance and longevity for your lawn mower.
Importance Of Professional Maintenance
Regular professional maintenance is crucial for a well-functioning lawn mower carburetor. Keep your carburetor clean by following proper cleaning techniques to ensure optimal performance and longevity.
It’s important to recognize the signs that indicate when a professional tune-up or carburetor cleaning is necessary for your lawn mower. While some maintenance tasks can be handled easily by yourself, there are certain situations where professional expertise is required.
Here’s why professional maintenance is essential:
- Complexity of the task: Cleaning a lawn mower carburetor is a delicate process that requires technical knowledge and expertise. A professional can handle the intricate details involved in disassembling, cleaning, and reassembling the carburetor accurately.
- In-depth understanding: Professionals have a thorough understanding of how a lawn mower carburetor works. They are well-equipped to diagnose any underlying issues, such as clogging or damage, and provide appropriate solutions. Their experience allows them to identify potential problems even before they arise.
- Optimal performance: A professionally cleaned carburetor ensures your lawn mower works at its best. By removing built-up grime, dirt, and debris, professionals can restore your carburetor’s functionality and prevent future performance issues. This results in better fuel efficiency and improved overall performance of your lawn mower.
- Longevity of the mower: Regular professional maintenance, including carburetor cleaning, extends the lifespan of your lawn mower. Professionals can identify and address any issues that may cause long-term damage if left unattended. By ensuring that all components are functioning optimally, they help to prevent costly repairs or premature replacement of the mower.
- Safety: A poorly maintained carburetor can pose safety hazards such as fuel leaks or engine malfunctions. Professionals will inspect and test your carburetor, ensuring it operates safely and reliably. This gives you peace of mind, knowing that your lawn mower is in good condition and won’t put you or your property at risk.
While there are maintenance tasks you can handle yourself, it’s important to recognize the moments when professional assistance is necessary. Hiring a professional for occasional tune-ups and carburetor cleaning will ensure the longevity, optimal performance, and safety of your lawn mower.

Credit: m.youtube.com
Frequently Asked Questions For How To Clean A Lawn Mower Carburetor?
What’S The Easiest Way To Clean A Carburetor On A Lawn Mower?
The easiest way to clean a lawn mower’s carburetor is by removing it and using carburetor cleaner.
How Do You Clean A Lawn Mower Carburetor Without Removing It?
To clean a lawn mower carburetor without removing it, follow these steps: 1. Disconnect the spark plug wire to ensure safety. 2. Remove the air filter and clean it with a brush or replace it if necessary. 3. Spray a carburetor cleaner into the carburetor’s air intake while running the engine.
4. Allow the cleaner to sit for a few minutes, then start the engine and let it run until the cleaner is used up. 5. Reattach the air filter and spark plug wire, and your lawn mower carburetor should be clean and ready to use.
How Do I Know If My Lawn Mower Carburetor Is Clogged?
Check for signs like difficulty starting, stalling, rough idle, or decreased power in your lawn mower.
Is There A Way To Clean A Carburetor Without Removing It?
Yes, you can clean a carburetor without removing it using carburetor cleaner and following specific instructions.
How Often Should I Clean My Lawn Mower Carburetor?
It is recommended to clean your lawn mower carburetor at least once a year or whenever you notice performance issues.
Conclusion
Maintaining a clean and properly functioning lawn mower carburetor is essential for a well-maintained yard. By following the steps outlined in this blog post, you can easily clean your lawn mower carburetor and ensure optimal performance. Start by disconnecting the spark plug and draining the fuel from the carburetor to prevent accidents.
Next, dismantle the carburetor and soak its parts in a carburetor cleaner solution to remove debris and build-up. Use a small brush to clean the smaller components and a soft cloth to wipe away any residue. Once cleaned, reassemble the carburetor and reconnect it to the mower.
Finally, refill the fuel tank and start the mower to check if it’s running smoothly. Regularly cleaning the carburetor will help extend its lifespan and ensure your lawn mower operates efficiently, reducing the risk of breakdowns. Keep your yard looking its best by maintaining a clean lawn mower carburetor.