Last Updated on November 16, 2025
To test a lawn mower solenoid, start the engine and use a multimeter to measure the current flowing through the solenoid.
Lawn Mower Solenoid: What Is It And How Does It Work?
A lawn mower solenoid is a crucial component in the starting system of a lawn mower, responsible for engaging the engine. To test a lawn mower solenoid, you can use a multimeter to check for continuity and measure the voltage.
A lawn mower solenoid plays a crucial role in starting and shutting down the mower’s engine. It is an electrical component that acts as a bridge between the ignition switch and the starter motor. When the solenoid receives an electrical signal from the ignition switch, it activates a magnetic field that pulls a metal plunger, connecting the high current battery to the starter motor.
This engagement allows the motor to spin, initiating the engine’s ignition process. Understanding the electrical connections and functionality of a lawn mower solenoid is essential for troubleshooting any starting issues.
Explaining The Role Of The Solenoid In A Lawn Mower:
- The solenoid acts as a key component responsible for starting the lawn mower engine.
- It receives an electrical signal from the ignition switch, which triggers its activation.
- Once activated, the solenoid creates a magnetic field that pulls the metal plunger towards the starter motor.
- This movement completes the circuit, connecting the high current battery power to the starter motor.
- The starter motor now receives the necessary power to spin and initiate the engine’s ignition process.
Understanding how the solenoid works and its role in the overall functionality of a lawn mower is essential for troubleshooting any starting issues that may arise. By recognizing the importance of the solenoid and its electrical connections, you can diagnose and address any problems effectively.
Signs Of A Faulty Solenoid In A Lawn Mower
A faulty solenoid in a lawn mower can cause starting issues and erratic engine performance. To test the solenoid, you can use a multimeter to check for continuity and resistance in the electrical circuit. This will help determine if the solenoid needs to be replaced.
Identifying Common Symptoms Of A Malfunctioning Solenoid
If you’re experiencing issues with your lawn mower, a faulty solenoid could be the culprit. The solenoid plays a crucial role in starting and shutting off the mower, so it’s important to identify any signs of malfunction early on. Here are some common symptoms to watch out for:
- Engine not starting: When you turn the ignition key, if the engine fails to start or there is no response at all, it could indicate a problem with the solenoid.
- Clicking noise: If you hear a clicking sound when you try to start the mower, it may suggest that the solenoid is faulty or not engaging properly.
- Intermittent starting: If the mower starts intermittently, working sometimes and not others, the solenoid could be failing. This can happen due to worn-out internal components.
- Engine shutting off abruptly: If the engine shuts off suddenly without any warning, the solenoid might be malfunctioning and cutting off the fuel supply.
It’s important to remember that these symptoms can also be associated with other issues. Therefore, it’s advisable to troubleshoot further to confirm whether the solenoid is indeed at fault. Now let’s move on to troubleshooting techniques specifically related to starting or shutting off the mower.
Troubleshooting Issues Related To Starting Or Shutting Off The Mower:
When it comes to troubleshooting problems with starting or shutting off your lawn mower, here are some effective techniques to consider:
- Check battery connections: Ensure the battery connections are secure and free from corrosion. Loose or corroded connections can prevent the solenoid from receiving sufficient power.
- Inspect wiring connections: Look for any loose or damaged wiring connections related to the solenoid. Faulty wiring can disrupt the flow of electricity and affect the solenoid’s performance.
- Test the solenoid with a multimeter: Using a multimeter, measure the voltage across the solenoid terminals while someone turns the key to start the mower. If the reading is significantly lower than expected, it may indicate a faulty solenoid.
- Clean or replace the solenoid: If you suspect the solenoid is faulty, you can try cleaning its contacts using an electrical contact cleaner. If cleaning doesn’t resolve the issue, it may be necessary to replace the solenoid with a new one.
Remember to prioritize your safety when working on your lawn mower. Disconnect the spark plug wire before conducting any maintenance or troubleshooting procedures to avoid accidental starts or electrical shocks.
By recognizing the signs of a faulty solenoid and following these troubleshooting tips, you can effectively diagnose and resolve issues related to starting or shutting off your lawn mower.
Step-By-Step Guide To Testing A Lawn Mower Solenoid
Learn how to test a lawn mower solenoid step-by-step with this comprehensive guide. Discover the process to ensure your mower is running smoothly and efficiently.
When it comes to troubleshooting a lawn mower solenoid, it’s important to follow a systematic approach. By testing the solenoid, you can determine if it’s functioning properly or if it needs to be replaced. In this step-by-step guide, we will walk you through the process of testing a lawn mower solenoid using a multimeter.
Let’s get started!
Gathering The Necessary Tools And Equipment:
Before you begin testing the lawn mower solenoid, make sure you have the following tools and equipment:
- Multimeter: This device will be used to measure the electrical current and resistance.
- Safety gloves and goggles: Protect your hands and eyes from any potential hazards.
- Wrench or socket set: You may need to remove the solenoid for testing, so having the appropriate tools handy is important.
Checking The Battery And Electrical Connections:
Before testing the solenoid, it’s essential to ensure that the battery and electrical connections are in good condition. Follow these steps:
- Inspect the battery: Check if the battery terminals are clean and free of corrosion. If there is any corrosion, clean the terminals using a wire brush.
- Test the battery voltage: Use a multimeter to measure the voltage of the battery. It should read around 12 volts. If the voltage is significantly lower, recharge or replace the battery.
- Check the electrical connections: Examine all the electrical connections, including the cables and wires connected to the solenoid. Ensure they are tight and free of any damage.
Testing The Solenoid With A Multimeter:
Now that we have verified the battery and electrical connections, let’s proceed with testing the solenoid:
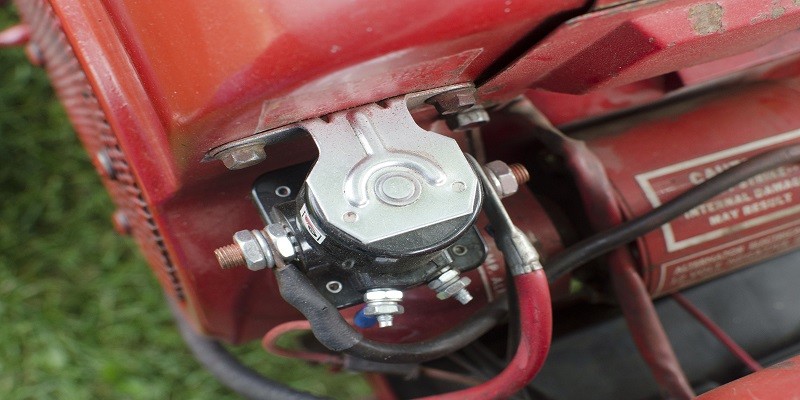
- Locate the solenoid: The solenoid is usually mounted on the lawn mower’s engine near the battery. Refer to the user manual if you’re unsure of its position.
- Set up the multimeter: Switch the multimeter to the resistance (ohm) mode. Touch the multimeter probes together to verify that the reading is zero (or close to zero).
- Disconnect the wires: Remove the wires or cables connected to the solenoid. Take note of their positions for reconnection purposes.
- Test the solenoid: Place one multimeter probe on the solenoid’s metal body and the other probe on the terminal where the cable was connected. A functioning solenoid should have a low resistance reading on the multimeter (around 3-5 ohms).
Interpreting The Results And Determining The Solenoid’S Condition:
After testing the solenoid, you will need to interpret the results to determine its condition. Here’s what you should look for:
- Low resistance reading: If the multimeter displays a low resistance reading within the expected range, the solenoid is most likely in good working condition.
- High resistance reading: However, if the multimeter shows a high resistance reading or an open circuit, it indicates that the solenoid is faulty and needs to be replaced.
- No resistance reading: If the multimeter displays no resistance reading (infinite resistance), it suggests a complete failure of the solenoid.
By following this step-by-step guide, you can effectively test your lawn mower solenoid and assess its condition. Remember, safety should always be a priority, so wear protective gear and exercise caution throughout the process.

Credit: www.gardentoolexpert.com
Frequently Asked Questions Of How To Test A Lawn Mower Solenoid?
How Do I Know If My Lawn Mower Solenoid Is Bad?
Here’s how to determine if your lawn mower solenoid is bad: 1. Check for a clicking sound when you turn the key. 2. Test the battery voltage using a multimeter. 3. Inspect the connection terminals for corrosion or damage. 4. Consult a professional if these steps don’t resolve the issue.
How Do You Manually Test A Solenoid?
To manually test a solenoid: 1. Disconnect any power supply and remove the solenoid from the circuit. 2. Apply a voltage to the solenoid and listen for a clicking sound. 3. Measure the resistance of the solenoid coil with a multimeter.
4. Ensure the plunger moves freely without any obstruction or sticking.
How Do You Test A Solenoid With A Multimeter?
To test a solenoid with a multimeter, follow these steps: 1. Set the multimeter to the resistance or ohms setting. 2. Connect the positive (red) lead to one end of the solenoid and the negative (black) lead to the other end.
3. Check the multimeter reading, which should display a low resistance value if the solenoid is functioning correctly. 4. If the reading is infinite or significantly high, it indicates a faulty solenoid that needs to be replaced.
How Do You Test A Solenoid To See If It’S Good?
To test a solenoid and check if it’s working well, follow these steps: 1. Disconnect the power source and remove the solenoid from the circuit. 2. Use a multimeter to measure the resistance across the solenoid’s terminals. 3. Compare the measured resistance with the manufacturer’s specifications.
4. If the measured resistance falls within the specified range, the solenoid is good; otherwise, it may need to be repaired or replaced.
How Do I Know If My Lawn Mower Solenoid Is Working?
To test if your lawn mower solenoid is working, you can use a multimeter to check for continuity and voltage.
Conclusion
To sum up, understanding how to test a lawn mower solenoid is crucial for ensuring your lawn mower’s optimal performance. By following a simple step-by-step process, you can easily diagnose any solenoid issues and determine if a replacement is necessary.
Remember to start by disconnecting the battery to ensure safety and then proceed with checking the battery voltage, continuity, and resistance. The use of a multimeter will greatly simplify the testing process and provide accurate readings. Additionally, inspecting the solenoid for any physical damage or signs of wear and tear is essential.
Regular maintenance and testing of the solenoid will help prolong the lifespan of your lawn mower and ensure it functions smoothly. By taking these proactive steps, you can save time and money by avoiding unnecessary repairs or replacements. Keep your lawn mower running efficiently by regularly testing and maintaining its solenoid.