Last Updated on August 7, 2025
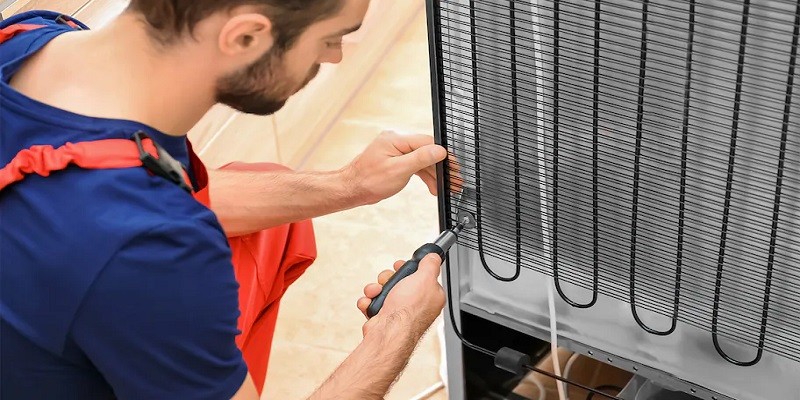
To clean refrigerator coils, disconnect the power, remove the panel, and use a brush or vacuum to remove dust and debris. Cleaning your refrigerator coils is an important maintenance task that helps improve energy efficiency and extend the lifespan of your appliance.
Over time, the coils on the back or underneath your fridge can collect dust, dirt, and pet hair, causing them to work harder to cool your food. Fortunately, it’s easy to clean refrigerator coils and keep your fridge running smoothly.
We will guide you through the steps to clean your refrigerator coils effectively. By following these simple techniques, you can keep your fridge working efficiently and save on your energy bills. So, let’s get started!
The Role Of Refrigerator Coils In Cooling Efficiency
Refrigerator coils play a crucial role in the cooling efficiency of your fridge. Regularly cleaning the coils helps optimize their performance and ensures better cooling efficiency. Find out how to clean refrigerator coils efficiently for maximum cooling effectiveness.
The Purpose Of Refrigerator Coils
Refrigerator coils play a vital role in maintaining the cooling efficiency of your appliance. Understanding their purpose is essential in keeping your fridge running optimally. Here are a few key points to consider:
- Coils, usually located either at the back or underneath the refrigerator, are responsible for releasing heat and cooling down the refrigerant, which helps to keep your food fresh and cool.
- There are two types of coils in a refrigerator: Condenser coils and evaporator coils. Condenser coils are responsible for dissipating the heat generated by the compressor, while evaporator coils facilitate the refrigeration cycle.
- Coils are usually made of copper or aluminum, allowing for efficient heat transfer and cooling.
- The coils require proper airflow to function effectively. When obstructed by dirt, dust, or debris, their cooling efficiency is compromised.
How Dirty Coils Can Affect Cooling Performance
A dirty coil can significantly impact the cooling performance of your refrigerator. Here are a few ways in which this can occur:
- Dust, pet hair, and other debris can accumulate on the coils over time, forming a layer that inhibits heat dissipation. As a result, the refrigerator has to work harder to maintain the desired temperature, leading to increased energy consumption and reduced cooling efficiency.
- A buildup of dirt on the coils can also restrict airflow, preventing adequate heat transfer. This can lead to temperature imbalances within the refrigerator, causing certain areas to be colder or warmer than others.
- The strain put on the compressor due to dirty coils can eventually lead to its malfunctioning or premature failure, resulting in costly repairs or the need to replace the refrigerator altogether.
- In addition to affecting cooling efficiency, dirty coils can also impact the overall lifespan of your refrigerator.
To ensure optimal cooling performance and extend the lifespan of your appliance, it is crucial to regularly clean the refrigerator coils. By doing so, you can prevent energy wastage, maintain consistent temperatures, and enjoy fresh food for longer.
Signs That Your Refrigerator Coils Need Cleaning
Is your refrigerator not cooling efficiently? It could be a sign that your coils need cleaning. Learn how to clean refrigerator coils for optimal performance and energy efficiency.
It’s easy to overlook the cleanliness of your refrigerator coils, but neglecting them can lead to various problems. By keeping an eye out for these telltale signs, you can identify when your coils need cleaning:
- Poor cooling performance: If you notice that your refrigerator is struggling to maintain a cool temperature, it might be due to dirty coils. Dust and debris accumulation can obstruct the coils’ ability to dissipate heat efficiently, resulting in reduced cooling performance.
- Excessive energy consumption: Dirty coils force your refrigerator to work harder to achieve the desired temperature, leading to increased energy usage. Keep an eye on your energy bills – if you notice a significant spike without any apparent reason, it could be an indicator that your coils need cleaning.
- Visible dust and debris buildup: Take a moment to inspect the back or bottom of your refrigerator. If you notice a thick layer of dust or debris coating the coils, it’s a clear sign that they are overdue for cleaning. Keep in mind that the coils might vary in location depending on your refrigerator model.
- Hot exterior: When the coils are clogged, they are less effective at dissipating heat, causing the exterior of your refrigerator to feel unusually warm. If you place your hand on the back or sides of the appliance and feel excessive heat, it’s likely time to clean the coils.
- Unusual noises: Dirty coils can lead to issues with the compressor, which can cause your refrigerator to make strange noises. If you hear buzzing, rattling, or any other unusual sounds coming from your appliance, it’s worth checking the condition of the coils.
- Frequent temperature fluctuations: When the coils are covered in dirt and debris, they can disrupt the refrigerator’s cooling system, leading to inconsistent temperature regulation. If you find that the temperature inside your refrigerator fluctuates frequently, it could be a sign that the coils need cleaning.
Proper maintenance of your refrigerator coils is essential to ensure the longevity and optimal performance of your appliance. Regularly checking for these signs will help you determine when it’s time to clean the coils and keep your refrigerator running smoothly.
Gathering The Necessary Tools And Materials
Cleaning refrigerator coils is a vital task to maintain appliance efficiency. Gather the necessary tools and materials like a vacuum cleaner, a coil brush, and a screwdriver to remove the grille and access the coils for thorough cleaning.
Cleaning the coils of your refrigerator is an essential task to ensure its optimal performance. Over time, dust, dirt, and debris can accumulate on the coils, causing the fridge to work harder and less efficiently. To tackle this maintenance task, it is important to gather the necessary tools and materials for a thorough cleaning.
In this section, we will discuss the essential tools you will need and the items required for a comprehensive coil cleaning.
Essential Tools For Coil Cleaning:
- Coil brush: A coil brush is a specialized tool designed to clean refrigerator coils effectively. It has stiff bristles that can remove dirt from the coils without causing damage.
- Vacuum cleaner with a brush attachment: A vacuum cleaner with a brush attachment can help you remove loose debris and dust from the coils easily.
- Screwdriver: Some refrigerator models require you to remove a panel to access the coils. In such cases, a screwdriver will be needed to remove and reattach the panel securely.
Items Needed For A Thorough Cleaning:
- Unplugged refrigerator: Before starting the cleaning process, it is crucial to unplug the refrigerator to ensure your safety and prevent any accidents.
- Cleaning solution: You can use a mild detergent mixed with warm water or a specialized coil cleaning solution. Avoid using harsh chemicals that could damage the coils.
- Spray bottle: If you opt for a homemade cleaning solution, a spray bottle will be useful to apply the mixture evenly on the coils.
- Soft cloth or sponge: To wipe away dirt and grime, you’ll need a soft cloth or sponge. Avoid using abrasive materials that could scratch the coils.
- Towels or plastic sheets: Place towels or plastic sheets around the refrigerator to protect the surrounding area from any potential water or cleaning solution spills.
- Safety goggles and gloves: To protect your eyes from debris and your hands from cleaning chemicals, it is advisable to wear safety goggles and gloves.
Gathering these essential tools and materials will ensure that you have everything you need to clean the refrigerator coils thoroughly. Now that you’re prepared, let’s move on to the next section, where we’ll guide you through the step-by-step process of cleaning the coils.

Credit: www.homeserve.com
Safety Precautions Before Starting
Ensure your safety by following these precautions before cleaning your refrigerator coils. Take the necessary steps to protect yourself from electric shock and injury.
Your safety is of utmost importance when cleaning refrigerator coils. Taking the necessary precautions can ensure a smooth and accident-free cleaning process. Before getting started, there are a few key safety measures to keep in mind.
Tips For Safely Powering Off The Refrigerator:
- Locate the power cord at the back of the refrigerator and unplug it from the electrical outlet.
- Alternatively, to cut off power supply, you can also turn off the refrigerator from the circuit breaker or fuse box.
- Before proceeding, make sure the refrigerator is completely shut off and no electrical current is running through it.
Ensuring Personal Safety During The Cleaning Process:
- Wear protective gloves to shield your hands from dirt, dust, and any potential hazards.
- Consider wearing safety goggles to protect your eyes from flying debris or particles.
- It is advisable to wear a face mask or respirator to avoid inhaling dust or chemicals.
- Avoid wearing loose clothing or jewelry that might get caught in the coils or moving parts.
- Use a sturdy step stool or ladder to reach higher coils, ensuring stability and preventing falls.
- Never use sharp or pointed objects to scrape off dirt, as this may damage the coils or cause injuries.
- If using cleaning solutions, follow the manufacturer’s instructions and handle them with care.
- Always use non-abrasive cleaning tools to avoid damaging the delicate coil fins.
Remember, safety should be your top priority throughout the process. By following these safety precautions, you can efficiently clean your refrigerator coils while protecting yourself from any potential harm.
Removing Access Panels And Grille
To clean refrigerator coils effectively, start by removing access panels and grilles. This allows you to reach the coils and remove dust and debris, enabling better performance and energy efficiency.
Locating The Access Panels And Grille:
- Start by locating the access panels and grille on your refrigerator. These are usually located at the front or back of the appliance.
- Check the user manual or the manufacturer’s website for specific instructions on where to find the access panels and grille for your particular refrigerator model.
Instructions On How To Remove Them Safely:
To remove the access panels and grille, follow these steps:
- Unplug the refrigerator from the power source to ensure your safety.
- Look for any screws or clips holding the access panels and grille in place. Use a screwdriver or a flat-head tool to remove the screws or unclip the panels.
- Gently pull the panels or grille away from the refrigerator. Be careful not to force them or apply excessive pressure, as this may cause damage to the components.
- Set aside the removed panels and grille in a safe place.
- Take a moment to inspect the panels and grille for any dirt, dust, or debris that may have accumulated. You can use a soft brush or a vacuum cleaner to remove the buildup.
- Removing the access panels and grille provides you with better access to the refrigerator coils and allows for more effective cleaning.
Remember to refer to the manufacturer’s instructions before attempting to remove the access panels and grille, as the process may vary depending on your refrigerator model. Safety should be your top priority when cleaning refrigerator coils, so always ensure that the appliance is unplugged before removing any components.
Vacuuming Loose Debris
To clean refrigerator coils, start by vacuuming loose debris to improve efficiency and prevent overheating. This simple maintenance step can prolong the life of your refrigerator and save energy.
Using A Vacuum To Remove Dust And Dirt
Keeping your refrigerator coils clean is essential for maintaining its performance and energy efficiency. Over time, these coils can collect dust, dirt, and debris, which can hinder their ability to release heat properly. One of the most effective ways to clean refrigerator coils is by using a vacuum.
Here’s how you can do it:
- Ensure safety: Before starting the cleaning process, unplug your refrigerator to avoid any electrical hazards.
- Access the coils: Locate the coils, usually found either at the back of the fridge or underneath it. Refer to your refrigerator’s manual if you’re not sure where to find them.
- Brush off loose debris: Begin by using a nylon brush or a stiff-bristled paintbrush to gently loosen any dirt or dust accumulated on the coils. This step helps prepare the coils for the vacuuming process.
- Use a crevice tool: Attach a crevice tool to your vacuum cleaner to reach the hard-to-reach areas around the coils. It allows you to clean thoroughly, even in tight spaces.
- Vacuum the coils: Slowly and methodically, guide the crevice tool along the coils, removing the dust and dirt. Start from the top and work your way down, making sure to cover all areas.
- Repeat if necessary: Depending on the level of dirt buildup, you may need to repeat the vacuuming process a few times until the coils are clean.
- Dispose of the debris: Empty the vacuum canister or bag outside to prevent the dust from being redistributed indoors.
Regularly vacuuming your refrigerator coils can significantly improve its performance and energy efficiency, prolonging its lifespan.
Scrubbing Coils With A Soft Brush
To effectively clean refrigerator coils, use a soft brush to scrub away dirt and debris. This gentle method ensures thorough cleaning and maintains the efficiency of your refrigerator.
Choosing The Right Brush For The Job
- A soft-bristled brush is essential for cleaning refrigerator coils without causing damage.
- Look for a brush with nylon or natural hair bristles to minimize scratching or bending of the coil fins.
- Consider the size of the brush head to ensure easy maneuverability in tight spaces.
- Opt for a brush with a long handle or an extender attachment for reaching coils located at the back of the refrigerator.
- Avoid using wire brushes or abrasive scrubbers that could potentially harm the delicate coils.
Proper Techniques For Gentle But Effective Scrubbing
- Start by unplugging the refrigerator or turning off the power to prevent any accidents.
- Use a vacuum cleaner with a brush attachment to eliminate loose dirt and dust from the coils.
- Gently brush the coils in an up-and-down or side-to-side motion to dislodge stubborn debris.
- Pay extra attention to the areas where dirt tends to accumulate, such as the bottom portion of the coils.
- Avoid applying excessive pressure while scrubbing to avoid damaging the coils.
- Regularly clean the brush to prevent spreading dirt or dust back onto the coils.
- Finish by vacuuming once again to remove any remaining debris.
Remember, cleaning your refrigerator coils is an important maintenance task that helps improve the appliance’s efficiency and prolong its lifespan. By choosing the right brush and using proper scrubbing techniques, you can remove the buildup of dirt and dust, allowing your refrigerator to operate optimally.
Keep in mind that regular coil cleaning can also lead to energy savings and reduce the risk of potential malfunctions. So, set aside some time to give your refrigerator coils the care they deserve.
Wiping Down Coils With Damp Cloth
To clean refrigerator coils, use a damp cloth to wipe them down. This helps remove dust and debris, improving the efficiency of your fridge.
Regularly cleaning your refrigerator coils is crucial for maintaining its optimal performance and prolonging its lifespan. One effective way to clean the coils is by wiping them down with a damp cloth. This method helps remove dust, dirt, and other debris that may have accumulated over time.
To ensure you clean the coils thoroughly without causing any damage, follow these helpful tips:
Preparing A Cleaning Solution For Wiping Down Coils:
- Mix a solution of mild detergent and warm water in a bucket.
- Ensure that the detergent is gentle and specifically formulated for cleaning purposes.
- Dilute the detergent according to the manufacturer’s instructions to avoid any potential damage.
- Stir the solution until it creates a soapy mixture.
Tips For Thorough Cleaning Without Causing Damage:
- Unplug your refrigerator or turn off the power supply before cleaning the coils to avoid any electrical accidents.
- Locate the coils, which are usually found either at the back of the refrigerator or underneath.
- Gently remove any loose debris or visible clumps of dirt from the coils by hand.
- Dampen a clean cloth with the prepared cleaning solution, making sure it is not soaking wet.
- Slowly wipe down the coils, moving in an up-and-down or side-to-side motion, depending on their orientation.
- Be careful not to apply excessive pressure that could potentially damage the coils.
- Pay close attention to hard-to-reach areas, corners, and crevices, ensuring all dirt and grime are thoroughly removed.
- As the cloth becomes soiled, rinse it in clean water, wring out any excess moisture, and continue cleaning.
- Once you have wiped down all the coils, allow them to air dry completely before plugging the refrigerator back in or turning on the power.
- Remember to clean the coils every three to six months, or more frequently if you have pets or live in a dusty environment.
By following these guidelines and regularly wiping down your refrigerator coils, you can optimize its cooling efficiency and prevent potential issues that may arise from dirty coils. Maintaining clean coils not only keeps your refrigerator running smoothly but also helps save energy and might even extend its overall lifespan.
Reassembling And Powering Up The Refrigerator
Learn how to clean refrigerator coils effectively to ensure optimal cooling and energy efficiency. By reassembling and powering up your refrigerator correctly, you can prolong its lifespan and save on electricity bills. Follow our simple steps for a clean and well-functioning appliance.
Once you have successfully cleaned the refrigerator coils, it’s time to put everything back in place and restore power to the refrigerator. Follow these step-by-step instructions to ensure a smooth reassembly process:
Step-By-Step Instructions For Putting Everything Back In Place
- Retrieve the drip pan and slide it back into its designated spot below the refrigerator. Make sure it is properly aligned and secure.
- Carefully position the kick plate or access panel back onto the front or rear of the refrigerator, depending on its design. Use the appropriate screws or clips to firmly attach it.
- Reattach the fridge’s base grille, ensuring that it is snugly fit and secure. This helps to prevent any dust or dirt from entering underneath the refrigerator.
- Take out the condenser fan and mount it back onto its original location. Use the appropriate screws or clips to secure it in place.
- Gently slide the refrigerator back into its designated spot, being cautious not to damage the power cord or any other components.
- Plug the refrigerator power cord back into the electrical outlet. Ensure that the outlet is functioning properly and providing power to the appliance.
- If your refrigerator has a water line, carefully reconnect it to the water supply and ensure there are no leaks. Monitor the connection closely during the initial startup period.
- Once everything is properly reassembled, turn on the power to the refrigerator by either flipping the circuit breaker or pressing the power button.
Restoring Power To The Refrigerator
- Verify that the power cord is securely plugged into a working electrical outlet.
- Double-check that the circuit breaker or fuse controlling the refrigerator’s power supply is in the “ON” position.
- Listen for any sounds indicating that the refrigerator has powered up and is running again.
- Monitor the appliance closely for the next few hours to ensure that it is cooling properly.
- If there are any issues or concerns, consult the refrigerator’s user manual or contact a professional technician for assistance.
Remember, by properly reassembling and powering up your refrigerator, you can now enjoy its efficient cooling capabilities while also prolonging its lifespan. Take the time to perform regular maintenance, including cleaning the coils, to keep your refrigerator running smoothly and save on energy costs.
Setting A Cleaning Schedule
Regularly cleaning the refrigerator coils is essential for optimal performance. Learn how to clean refrigerator coils efficiently to improve energy efficiency and prevent potential problems.
Cleaning the refrigerator coils is an essential task that should be incorporated into your regular maintenance routine. By regularly cleaning the coils, you can ensure that your refrigerator stays in optimal condition and operates efficiently. Here are some guidelines to help you establish a cleaning schedule for your refrigerator coils:
Recommended Frequency For Coil Cleaning:
- Once every six months: Cleaning the coils every six months is generally recommended. This frequency allows you to prevent the buildup of dirt, dust, and other debris that can obstruct the coils and reduce their efficiency. However, if you have pets or live in a particularly dusty environment, you may need to clean the coils more frequently.
- Monitor for signs of dirt: Keep an eye out for signs that the coils are becoming dirty. Excessive dust buildup or reduced cooling efficiency may indicate that it is time to clean the coils. If you notice any of these signs, schedule a cleaning session regardless of the recommended timeframe.
- Evaluate your individual needs: Consider your specific circumstances when determining the frequency of coil cleaning. Factors such as the number of people in your household, the size of your refrigerator, and the overall usage can impact how often you should clean the coils.
Incorporating it into your regular maintenance routine:
- Mark it on your calendar: Create a reminder in your calendar every six months to clean the refrigerator coils. This will help you remember to perform this important task and keep your appliance running efficiently.
- Combine it with other maintenance tasks: To streamline your maintenance routine, consider combining coil cleaning with other refrigerator upkeep tasks. For example, you can clean the coils on the same day that you defrost the freezer or clean the interior of the refrigerator.
- Take advantage of seasonal transitions: Use the change of seasons as a cue to clean the coils. This approach allows you to tie coil cleaning to other seasonal home maintenance tasks and ensures that you do not forget this crucial step.
By setting a cleaning schedule for your refrigerator coils, you can ensure that this essential maintenance task is regularly performed. Following the recommended frequency and incorporating it into your routine will help keep your refrigerator running smoothly and efficiently for years to come.
Additional Practices For Preventing Dirt Buildup
Prevent dirt buildup on your refrigerator coils with these additional practices. Keep your coils clean and functioning efficiently by removing dirt and debris regularly, ensuring proper airflow and extending the lifespan of your appliance.
Keeping The Surrounding Area Clean:
- Regularly clean the area around your refrigerator to prevent dirt and dust from accumulating on the coils. This will help ensure that the coils can function efficiently and maintain the optimal temperature inside the fridge.
- Use a broom or vacuum cleaner to remove any loose dirt, dust, or debris from the floor or lower vents near the refrigerator. Make sure to reach the corners and hard-to-reach areas.
- Consider using a soft brush attachment or a microfiber cloth to wipe away any visible dust or dirt from the walls and nearby surfaces. This will prevent them from finding their way to the coils.
- Pay special attention to the back of the refrigerator, as this is where the coils are usually located. Use a brush or a crevice attachment on your vacuum cleaner to gently remove any dust or cobwebs that may have accumulated there.
- If there are any exposed coils at the back of your refrigerator, avoid placing objects on or near them. This can obstruct the airflow and lead to inefficient cooling.
- Keep the area around the refrigerator free from spills and leaks. Liquids can seep into the coils, causing damage and reducing their effectiveness.
Tips For Reducing Dust And Pet Hair Accumulation:
- Place a doormat near the refrigerator to minimize the amount of dirt and dust entering the area. Encourage family members and guests to wipe their shoes before entering the kitchen.
- Regularly sweep or vacuum the kitchen floor to prevent dust and pet hair from accumulating near the refrigerator. This will reduce the chances of these particles being drawn to the coils.
- Consider using an air purifier or dehumidifier in your kitchen to minimize airborne particles that can settle on the coils. This can be especially helpful if you have pets that shed a lot of fur.
- If you have pets, make sure to brush them regularly to minimize shedding. This will help prevent pet hair from getting into the coils and affecting their performance.
- Keep the refrigerator area well-ventilated by opening windows or using an exhaust fan. Good airflow can help prevent dust and pet hair from settling on the coils.
Remember, by keeping the surrounding area clean and taking precautions to reduce dust and pet hair accumulation, you can ensure that your refrigerator coils remain clean and functional, thereby improving the overall efficiency of your fridge.
Troubleshooting Common Coil Related Issues
Is your refrigerator not cooling properly? Learn how to clean the coils to troubleshoot common coil-related issues and restore your appliance’s performance.
Refrigerator coils play a crucial role in the efficiency and proper functioning of your appliance. Over time, however, these coils can become dirty or encounter various issues that may impact their performance. In this section, we will explore some common coil-related problems and provide troubleshooting tips to help you resolve them.
Troubleshooting Tips For Issues That May Arise:
Excessive Dust Buildup: If you notice a layer of dust on your refrigerator coils, it’s essential to clean them as this buildup can reduce the fridge’s efficiency. Here’s what you can do:
- Use a vacuum cleaner with a brush attachment to remove the loose dirt and dust from the coils.
- Next, use a coil brush or a soft-bristle brush to gently dislodge any stubborn debris from the coils.
- Wipe any remaining dirt away with a damp cloth.
Coil Freezing: When the coils freeze, it can lead to inadequate cooling and potential damage to the compressor. Follow these steps to address this issue:
- Unplug the refrigerator and let it defrost completely to melt any ice buildup on the coils.
- Inspect the evaporator fan to ensure it’s functioning correctly.
- Check the defrost thermostat for continuity using a multimeter. If it’s defective, consider replacing it.
Coil Damage: Coils can sometimes become damaged due to accidental impacts or aging. Here’s what you can do if you notice bent or damaged coils:
- Turn off and unplug the refrigerator before attempting any repairs.
- Gently straighten any bent coils using a coil fin comb. Be careful not to apply excessive force and risk further damage.
- For significant damage, it’s best to consult a professional technician who can assess the problem and determine the appropriate course of action.
When To Seek Professional Help:
While regular maintenance and troubleshooting can often resolve coil-related issues, some situations may require professional assistance. Consider reaching out to a qualified technician in the following scenarios:
- Refrigerant Leak: If you suspect a refrigerant leak, it’s crucial to consult a professional. Refrigerant leaks can pose health hazards and require specialized equipment for repair.
- Electrical Problems: If you encounter electrical problems, such as a malfunctioning compressor or faulty wiring, it’s best to have a professional electrician or technician address the issue.
- Complex Repairs: For complex repairs beyond your comfort and expertise, seeking professional help ensures the safety and proper functioning of your refrigerator.
Remember that regular coil maintenance can help prevent many issues and ensure the longevity of your refrigerator. If you encounter any problems that you are unsure how to handle, it’s always better to seek professional help rather than risk causing more harm.
Frequently Asked Questions Of How To Clean Refrigerator Coils?
How Often Should You Clean Refrigerator Coils?
Clean refrigerator coils at least once every six months to maintain optimal performance. Substances like dust, pet hair, and debris can accumulate on the coils, affecting their efficiency. Cleaning also prevents overheating and extends the lifespan of the appliance. To clean the coils, first, unplug the refrigerator.
Locate the coils, usually at the back or underneath the unit. Use a vacuum cleaner or a brush to gently remove the debris, ensuring not to damage the coils. Pay extra attention to the areas near the fan. For stubborn dirt, a coil cleaning brush can be effective.
Once the coils are free from dirt, plug the refrigerator back in. Regular coil cleaning not only enhances the performance of the refrigerator but also saves energy and reduces electricity bills. A clean refrigerator coils keep your food fresh and your appliance running smoothly.
How Do I Clean The Coils At The Bottom Of My Refrigerator?
To clean the coils at the bottom of your refrigerator, follow these steps: 1. Unplug the refrigerator to avoid any electrical hazards. 2. Locate the coils at the back or bottom of the fridge. 3. Use a brush with soft bristles or a vacuum cleaner with a brush attachment to remove dust and debris from the coils.
4. Gently brush or vacuum in the direction of the fins to prevent damage. 5. For stubborn dirt, use a coil cleaning brush or a coil cleaning solution. 6. Rinse the coils with a damp cloth or sponge if necessary.
7. Once the coils are clean and dry, plug the refrigerator back in. 8. Remember to clean the coils at least once or twice a year for efficient cooling and energy consumption. Regularly cleaning the coils will help maintain the performance and lifespan of your refrigerator.
How Do I Know If My Refrigerator Coil Is Dirty?
A dirty refrigerator coil can lead to various issues. Here’s how to determine if yours needs cleaning: 1. Unplug the refrigerator and locate the coil at the back or bottom of the unit. 2. Inspect the coil visually – if it is covered in dust, debris, or pet hair, it is likely dirty.
3. Feel the coil with your hand – if it feels sticky or oily, it needs cleaning. 4. Listen for unusual sounds, such as hissing or rattling, which can indicate a dirty coil. 5. Monitor the temperature inside the refrigerator – if it is not as cold as usual, the coil might be dirty.
6. Check your energy bill – an increase in energy consumption suggests a dirty coil, as the fridge works harder to maintain the desired temperature. Regularly cleaning the coil improves the refrigerator’s performance and energy efficiency.
Is It Safe To Vacuum Fridge Coils?
Yes, it is safe to vacuum fridge coils. Cleaning the coils regularly helps improve efficiency and prevents overheating.
Conclusion
Maintaining the cleanliness of your refrigerator coils is crucial for efficient cooling and energy consumption. Regularly cleaning the coils can prevent dust and debris buildup, ultimately extending the lifespan of your appliance. By following the simple steps outlined such as unplugging the refrigerator, vacuuming the coils, and using a coil brush, you can easily remove any dirt or debris that may have accumulated.
It is recommended to clean the coils at least once or twice a year to ensure optimal performance. Additionally, investing in a coil cleaning brush and scheduling regular maintenance can further prevent costly repairs down the line. Remember, taking care of your refrigerator coils not only improves its performance but also saves you money on energy bills.
So, don’t neglect this simple task and keep your refrigerator running smoothly for years to come.