Last Updated on August 7, 2025
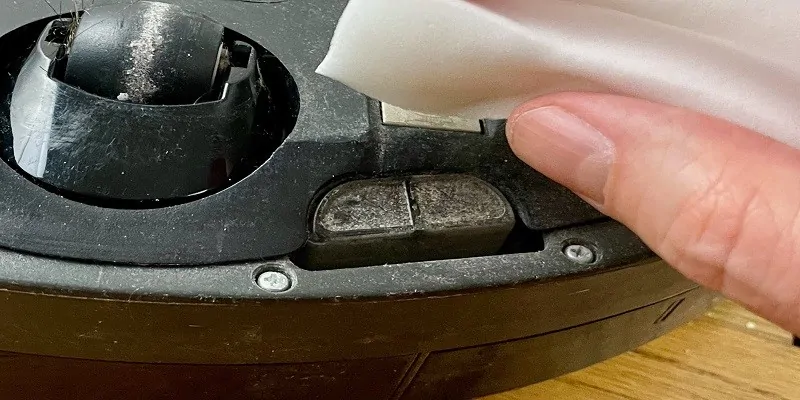
To clean roomba sensors, gently wipe them with a soft, lint-free cloth to remove any dirt or dust. Good maintenance of these sensors ensures optimal performance and longer lifespan for your roomba.
Keeping your roomba’s sensors clean is essential for maintaining its efficiency and effectiveness in cleaning your home. Over time, dust, dirt, and debris can accumulate on the sensors, hindering their ability to detect obstacles and navigate your space. By regularly cleaning the sensors with a soft cloth, you can ensure that they remain free from any build-up that may obstruct their functionality.
This simple maintenance task only takes a few minutes but can greatly improve the performance and longevity of your roomba. So, make it a part of your routine cleaning regimen to keep your roomba running smoothly and effectively.

Credit: www.vacuumtester.com
Roomba Sensors
Roomba sensors play a crucial role in its cleaning performance. To keep them functioning optimally, regular cleaning is essential. Here’s how you can effectively clean your roomba sensors for uninterrupted operation.
Roomba vacuums have advanced sensors that play a crucial role in their autonomous cleaning capabilities. These sensors enable the roomba to navigate around your home, avoid obstacles, and ensure thorough cleaning. In this section, we will delve into the different types of sensors utilized by roomba vacuums, how they work, and their importance in autonomous cleaning.
How Roomba Sensors Help In Autonomous Cleaning:
- Cliff sensors: Roomba vacuums are equipped with cliff sensors that detect sudden drops or stairs. These sensors prevent the roomba from tumbling down and getting damaged. When the cliff sensors detect a drop-off, the roomba alters its path to avoid falling.
- Bumper sensors: Bumper sensors are strategically placed on the front of the roomba. These sensors enable the roomba to detect and respond to physical obstacles in its path. When the bumper sensors make contact with an obstacle, the roomba changes direction to avoid collision and continues its cleaning task.
- Dirt detect sensors: Roomba vacuums come with dirt detect sensors to identify areas with a higher concentration of dirt. These sensors use acoustic and optic signals to detect dirt and debris on the floor. When a dirtier area is detected, the roomba concentrates its cleaning efforts in that specific spot, ensuring a more thorough clean.
- Optical sensors: Optical sensors are used by roomba vacuums to detect and navigate around furniture and other large objects in your home. These sensors emit infrared signals and calculate the distance to objects in their surroundings, allowing the roomba to avoid collisions and maneuver effectively.
- Wheel drop sensors: Roomba vacuums are fitted with wheel drop sensors that detect when the vacuum is lifted off the ground or stuck. These sensors help the roomba to reverse and change direction when it encounters an obstacle that prevents its smooth movement.
Understanding how roomba sensors work is essential for effective maintenance and cleaning of your roomba vacuum. Now that you have a grasp of the different types of sensors and their functions, let’s dive into the process of cleaning these sensors to ensure optimal performance.
Types Of Roomba Sensors
Roomba sensors come in different types and play a crucial role in its cleaning process. To ensure optimal performance, it’s important to clean these sensors regularly. Learn how to effectively clean roomba sensors for a seamless cleaning experience.
Roomba robotic vacuums are equipped with various types of sensors that help in navigating and cleaning your home efficiently. Understanding the different types of roomba sensors will help you maintain and clean them properly for optimal performance.
Cliff Sensors:
- Cliff sensors are crucial for preventing your roomba from tumbling down stairs or edges.
- These sensors emit infrared light and detect changes in distance to identify cliffs or drops.
- Roomba’s cliff sensors ensure that it avoids falling off ledges by changing its direction when it senses a drop.
Dirt Sensors:
- Dirt sensors are responsible for detecting dirt and debris on your floors.
- These sensors use optical or acoustic methods to identify areas that require thorough cleaning.
- When dirt sensors detect a high concentration of debris, roomba adjusts its cleaning pattern to focus on those areas for a more thorough clean.
Optical Sensors:
- Optical sensors are used by roomba to detect obstacles and navigate around the room.
- These sensors emit infrared light and measure the distance between the roomba and objects in its path.
- By analyzing the reflections of the emitted light, roomba can create a virtual map of its surroundings and maneuver accordingly.
Tactile Sensors:
- Tactile sensors on the roomba allow it to feel and respond to physical touch or pressure.
- These sensors are located on the front bumper of the roomba.
- When the roomba encounters an obstacle or wall, the tactile sensors detect the impact and prompt the roomba to change direction.
Understanding the different types of sensors in your roomba will assist you in properly maintaining and cleaning them. Taking care of these sensors will ensure that your roomba continues to clean your floors effectively and efficiently.
Importance Of Cleaning Roomba Sensors
Roomba sensors play a crucial role in efficient cleaning, making it essential to clean them regularly. Discover how to effectively clean your roomba sensors for optimal performance.
One of the crucial aspects of maintaining a roomba’s optimal performance lies in ensuring that its sensors are clean and free from any debris or obstructions. Cleaning the roomba sensors is paramount for two main reasons: ensuring accurate navigation and maintaining optimal cleaning efficiency.
Ensuring Accurate Navigation:
- Dust and debris can accumulate on the roomba’s sensors, hindering its ability to accurately navigate around a room.
- Clean sensors provide the roomba with clear signals and data, enabling it to effectively avoid obstacles and navigate various floor types without getting stuck.
- Accurate navigation ensures that the roomba can cover all areas of a room, leading to better cleaning results.
Maintaining Optimal Cleaning Efficiency:
- Any build-up of dirt, dust, or other debris on the sensors can affect the roomba’s cleaning efficiency. Clean sensors are crucial for the roomba to effectively detect and clean dirt, dust, and other particles in a timely manner.
- Sensor obstructions can cause the roomba to miss spots or repeatedly clean the same area, leading to inefficient cleaning and wastage of battery power.
- Regularly cleaning the sensors helps maintain consistent cleaning performance, ensuring that the roomba can efficiently clean different floor surfaces.
Cleaning the roomba sensors helps maximize its cleaning capabilities, providing you with a cleaner and more enjoyable living environment. By ensuring accurate navigation and maintaining optimal cleaning efficiency, your roomba can effectively clean your floors with minimal interruptions or performance issues.
Step-By-Step Guide To Clean Roomba Sensors
Learn how to effectively clean your roomba sensors with this step-by-step guide. Keep your roomba running smoothly by following these simple instructions.
Gather Necessary Tools:
- A microfiber cloth
- Compressed air canister
- Isopropyl alcohol
- Cotton swabs
To clean roomba sensors effectively, you’ll need a few tools at your disposal. Gather a microfiber cloth, a canister of compressed air, isopropyl alcohol, and some cotton swabs. These materials will help you remove debris and grime from the sensors, ensuring optimal performance for your roomba.
Power Off Roomba:
Before starting the cleaning process, make sure to power off your roomba. This ensures your own safety and prevents any potential damage to the device. So, locate the power button, usually found on the top or side of the roomba, and switch it off before proceeding to the next step.
Remove Debris From Sensors:
To clean the roomba sensors, it’s crucial to remove any debris that may have accumulated on them. Carefully inspect the sensors and use compressed air to blow away loose particles. Be thorough and attentive to ensure each sensor is free from dust, hair, or any other obstructions.
Clean Sensors Using A Microfiber Cloth:
Once you’ve removed the visible debris, grab your microfiber cloth and gently wipe the sensors. This cloth is perfect for removing smudges, fingerprints, or any remaining dirt. Avoid using harsh chemicals on the sensors, as they could damage the sensitive surfaces.
Instead, rely on the effectiveness of the microfiber cloth to restore the sensors’ cleanliness.
Reinstall And Power On Roomba:
After cleaning the sensors, it’s time to reinstall them and power on your roomba. Ensure that the sensors are securely and correctly positioned before turning on the device. This step guarantees that your roomba will operate at its best, efficiently navigating your home and keeping it clean.
By following this step-by-step guide, you can effectively clean your roomba sensors and maintain their optimal functionality. Keeping the sensors clean is essential for your roomba to operate at its peak performance, ensuring a thorough and efficient cleaning experience. So, take the time to gather the necessary tools, power off the roomba, remove debris, clean with a microfiber cloth, and then reinstall and power on your roomba.
Your robot vacuum will thank you!
Cleaning Cliff Sensors
To clean the sensors on your roomba, simply follow these easy steps. First, remove the brush guard and clean any debris. Next, wipe the sensors with a damp cloth to remove any dust or smudges. Finally, replace the brush guard and your roomba will be ready to go!
Taking care of your roomba’s sensors is essential to ensure optimal performance and navigation. One crucial sensor to focus on is the cliff sensor, which helps your roomba detect and avoid stairs or other drop-offs. Cleaning these sensors regularly will help maintain their functionality and prevent issues during cleaning cycles.
Let’s take a closer look at the location and purpose of these cliff sensors, as well as how to properly clean them.
Location And Purpose Of Cliff Sensors
The cliff sensors on your roomba are strategically placed to detect changes in height and prevent your robot vacuum from falling down stairs or ledges. They are typically located along the front of the robot, near the bumper. These sensors emit infrared beams that bounce back when they encounter an obstacle.
If the beams aren’t reflected back, it means there is a drop-off, and the roomba will avoid it.
To ensure your roomba’s cliff sensors perform optimally, here’s how you can remove dirt or debris:
- Step 1: Power off your roomba: before cleaning any sensors, it’s important to turn off your roomba and remove it from the charging dock to prevent any accidents.
- Step 2: Locate the cliff sensors: as mentioned earlier, the cliff sensors are usually found along the front of the roomba, close to the bumper. Take a moment to familiarize yourself with their location.
- Step 3: Prepare a clean, dry cloth: you will need a soft, lint-free cloth or microfiber cloth to clean the sensors. Avoid using any liquid or cleaning solutions as they can damage the sensors.
- Step 4: Gently wipe the sensors: with your cloth in hand, gently wipe the cliff sensors to remove any accumulated dirt, dust, or debris. Make sure to clean both sensors thoroughly.
- Step 5: Inspect for residue: once you’ve wiped the sensors, examine them closely for any remaining residue. If needed, repeat the wiping process until the sensors are clean and free from any obstructions.
- Step 6: Power on and test: after cleaning the cliff sensors, power on your roomba and test its navigation capabilities. The sensors should now function properly and enable your roomba to avoid any drop-offs effectively.
Regularly cleaning your roomba’s cliff sensors will ensure uninterrupted cleaning cycles and prevent potential accidents. Remember to clean these sensors whenever you notice a decrease in your roomba’s navigation abilities or if it consistently ignores drop-off hazards. By following these easy steps, your roomba will continue to roam your home efficiently and safely.
Cleaning Dirt Sensors
Clean roomba sensors effectively by gently removing any dirt or debris using a soft cloth or brush. Avoid using water or abrasive materials to ensure optimum performance.
Having clean sensors on your roomba is essential for its proper functioning. Dirt sensors are responsible for detecting dirt, dust, and debris on the floor, allowing the roomba to adjust its cleaning pattern accordingly. Over time, these sensors can become dirty themselves, affecting their accuracy and potentially hindering your roomba’s cleaning performance.
In this section, we will explore the location and purpose of dirt sensors, as well as how to effectively clean them.
Location And Purpose Of Dirt Sensors
- The dirt sensors on a roomba are typically located at the base of the vacuum unit, near the front wheels.
- Their purpose is to detect the presence of dirt, dust, or debris on the floor, prompting the roomba to focus its cleaning efforts in that specific area.
- When the sensors detect a higher concentration of dirt, they signal the roomba to perform additional passes and ensure a thorough cleaning.
To maintain optimal cleaning performance, it is important to keep the dirt sensors clean and free from any obstructions. Here’s how you can remove dirt or debris from dirt sensors:
Removing Dirt Or Debris From Dirt Sensors
- Start by turning off your roomba and flipping it over so you have access to the underside.
- Locate the dirt sensors, which are usually two small circular openings near the front wheels.
- Use a soft, dry cloth or brush to gently remove any visible dirt or debris from around the sensors. Be careful not to apply too much pressure to avoid damaging them.
- If necessary, you can also use a can of compressed air to blow away any stubborn particles that may be lodged inside the sensors.
- Once you have thoroughly cleaned the dirt sensors, flip your roomba back over and turn it on to resume its cleaning duties.
Regularly cleaning the dirt sensors will help ensure that your roomba operates at its best and provides efficient and thorough cleaning performance. By following these simple steps, you can keep your roomba’s dirt sensors in optimal condition, ensuring a consistently clean home.
Cleaning Optical Sensors
To effectively clean roomba sensors, follow these simple steps for optimal performance. Remove the dust bin, wipe the sensors gently with a soft cloth, and ensure the path is clear of any obstacles or debris. Enjoy a seamlessly clean home with a well-maintained roomba.
Optical sensors are a crucial component of your roomba’s cleaning system. These sensors work by detecting dirt, dust, and obstacles in your home, allowing the roomba to navigate effectively and clean efficiently. However, over time, these sensors can become dirty or obstructed, affecting the roomba’s performance.
In this section, we will explore the location and purpose of optical sensors and explain how to clean them.
Location And Purpose Of Optical Sensors
- Optical sensors are typically located underneath the roomba, near its brush mechanism.
- Their purpose is to detect obstacles, such as furniture or walls, and prevent the roomba from colliding with them.
- By cleaning these sensors regularly, you can ensure that your roomba operates smoothly and avoids any unnecessary obstacles during its cleaning cycle.
Removing Dirt Or Debris From Optical Sensors
To clean the optical sensors effectively, follow these steps:
- Start by turning off your roomba and removing it from the charger.
- Flip the roomba over to access the underside.
- Locate the optical sensors, which are usually small and rectangular in shape.
- Use a soft, dry cloth or a cotton swab to gently wipe away any dirt or debris on the sensors.
- If there are stubborn residues, you can dampen the cloth or cotton swab with water or a mild cleaning solution, ensuring that it is not dripping wet.
- Carefully wipe the sensors again, removing any remaining dirt or debris.
- Allow the sensors to dry completely before placing the roomba back on its charger or using it for cleaning.
- Repeat this cleaning process regularly, ideally once a month, to maintain optimal performance.
Cleaning the optical sensors of your roomba is a simple yet essential maintenance task. By removing dirt and debris from these sensors, you can ensure that your robotic vacuum operates efficiently and avoids unnecessary collisions. Remember to clean the optical sensors regularly to keep your roomba in top-notch condition.
Cleaning Tactile Sensors
Cleaning tactile sensors on your roomba is essential for optimal performance. Remove any dust or debris carefully using a soft, lint-free cloth for a thorough and effective clean.
Tactile sensors play a crucial role in the functionality of your roomba. These sensors are responsible for detecting obstacles and ensuring that your roomba moves around your home effectively. Over time, these sensors can get dirty or clogged, leading to reduced performance.
In this section, we will explore the location and purpose of tactile sensors, as well as how to clean them properly.
Location And Purpose Of Tactile Sensors
- Tactile sensors are located on the bumper of your roomba, strategically placed to detect any obstacles or objects in its path.
- These sensors work by using contact-sensitive technology, allowing the roomba to sense when it comes into contact with something.
- The purpose of tactile sensors is to ensure that your roomba doesn’t bump into furniture, walls, or other objects while navigating your home.
- By detecting obstacles, the roomba can adjust its course and avoid potential collisions, preventing any damage to your furniture or walls.
Removing Dirt Or Debris From Tactile Sensors
To ensure optimal performance of your roomba, it’s essential to keep the tactile sensors clean. Regular maintenance will help keep the sensors free from dirt, debris, and any other particles that may hinder their function. Follow these simple steps to clean the tactile sensors effectively:
- Power off your roomba: Before cleaning the sensors, make sure to turn off your roomba and remove it from the charging dock. This ensures your safety during the cleaning process.
- Inspect the tactile sensors: Take a close look at the bumper area where the sensors are located. Use a flashlight if necessary to check for any significant dirt or debris buildup.
- Gently wipe the sensors: Using a soft, lint-free cloth or cotton swab, carefully wipe the sensors to remove any dirt or debris. Be gentle to avoid damaging the sensors or other parts of your roomba.
- Remove stubborn dirt: If there are stubborn dirt particles that won’t come off easily, you can moisten the cloth or cotton swab with a small amount of water or rubbing alcohol. Make sure to wring out any excess liquid before wiping the sensors.
- Repeat the process: Continue wiping the sensors with gentle motions until they are clean and free from any visible dirt or debris. You may need to use multiple cloth or cotton swabs to ensure thorough cleaning.
- Allow the sensors to dry: Once you have cleaned the tactile sensors, allow them to air dry completely before turning your roomba back on or placing it back on the charging dock.
By following these steps regularly, you can ensure that your roomba’s tactile sensors remain clean and functional. This will help your roomba navigate your home efficiently, avoiding obstacles and providing you with a hassle-free cleaning experience.
Tips To Maintain Roomba Sensors
Maintaining roomba sensors is crucial for optimal performance. Regularly clean sensors using a soft cloth, avoid harsh chemicals, and check for any obstructions that may hinder their functionality.
Regular cleaning schedule:
- Set a regular cleaning schedule to ensure that your roomba sensors stay in optimal condition.
- Clean the sensors at least once a month to prevent dust and debris buildup.
- Make it a habit to clean the sensors after each cleaning cycle to maintain their performance.
Avoiding liquid cleaners:
- Avoid using liquid cleaners on the roomba sensors as they can damage the sensitive components.
- Instead, use a dry cloth or a soft brush to gently remove any dirt or dust from the sensors.
- If necessary, you can lightly dampen the cloth with water, but avoid getting the sensors wet.
Keeping roomba in a clean environment:
- Create a clean environment for your roomba by keeping the area free from excessive dust, pet hair, and debris.
- Regularly vacuum the floors and remove any obstacles that could potentially interfere with the roomba’s sensors.
- Proactively clean the area where your roomba operates to minimize the amount of dirt the sensors encounter.
Monitoring sensor performance:
- Regularly monitor the performance of your roomba’s sensors to ensure they are working optimally.
- Check for any error messages or indicators on the roomba’s display that may indicate sensor issues.
- If you notice any decline in the cleaning efficiency or accuracy of the roomba, it may be time to clean or recalibrate the sensors.
Remember, maintaining your roomba sensors is crucial for its performance and efficiency. By following these tips and establishing a regular cleaning routine, you can keep your roomba operating at its best and enjoy cleaner floors with less hassle.
Troubleshooting Sensor Issues
Learn how to effectively clean the sensors of your roomba to troubleshoot any issues and ensure optimal performance for your robot vacuum.
Is your roomba acting up and not cleaning as efficiently as it used to? It could be a problem with its sensors. Roomba relies on sensors to navigate and detect obstacles in its path. Over time, these sensors can become dirty or obstructed, leading to performance issues.
In this section, we’ll explore common sensor problems and solutions to help you get your roomba back on track.
Common Problems And Solutions:
- Roomba gets stuck frequently:
- Dirt on the cliff sensors: Use a soft, dry cloth to wipe the cliff sensors located on the underside of your roomba. These sensors detect stairs or other drop-offs and prevent roomba from falling. Ensure that the sensors are clean and free from any debris.
- Dirty obstacle sensors: Check the front bumper for any dirt or debris that may be hindering the obstacle sensors. Gently clean the bumper using a damp cloth to remove any obstructions.
- Tangled hair or threads: Sensor issues can also arise when hair or threads become tangled around roomba’s brushes or wheels. Regularly inspect and clean these areas to prevent any buildup that could interfere with the sensors.
- Roomba wanders aimlessly or fails to navigate correctly:
- Optical sensors need cleaning: The optical sensors on the front of your roomba may accumulate dirt or dust, affecting its navigation abilities. Use a microfiber cloth or an air duster to clean these sensors gently. Ensure they are free from any smudges or obstructions.
- Low battery charge: If your roomba’s battery is low, it may struggle to navigate efficiently. Make sure your roomba is adequately charged before each cleaning session to avoid navigation issues.
- Roomba avoids certain areas unnecessarily:
- Virtual wall or dual mode virtual wall barrier interference: If you have set up virtual wall or dual mode virtual wall barriers, make sure they are placed correctly. Objects near the barriers can interfere with roomba’s sensors and cause it to unnecessarily avoid certain areas. Move any potential obstructions away from the barriers or adjust their placement.
- Roomba repeatedly returns to the home base without cleaning:
- Docking station placement: Ensure that the home base is not obstructed or placed in a congested area. Roomba may have difficulty identifying the docking station if it’s not easily accessible. Clear any obstacles and ensure the home base is positioned in a central location.
Contacting Roomba Support If Necessary:
If you have attempted the troubleshooting steps above and are still experiencing issues with your roomba’s sensors, it may be time to contact roomba support for further assistance. They have a team of dedicated experts who can help diagnose and resolve any persistent problems with your roomba.
Remember, keeping your roomba’s sensors clean and well-maintained is essential for optimal performance. Regularly inspect and clean the sensors to ensure your roomba can navigate effectively and effortlessly keep your floors clean. Happy cleaning!
Frequently Asked Questions On How To Clean Roomba Sensors?
How Often Should I Clean Roomba Sensors?
You should clean roomba sensors every 1-2 months to ensure optimal performance.
Why Is It Important To Clean Roomba Sensors Regularly?
Regularly cleaning roomba sensors prevents dirt build-up and ensures accurate navigation for efficient cleaning.
How Do I Clean Roomba Sensors Properly?
To clean roomba sensors, use a soft cloth or cotton swab to gently wipe away any debris or dust.
What Happens If I Don’T Clean Roomba Sensors?
Neglecting to clean roomba sensors can result in decreased cleaning efficiency and potential errors in navigation.
Can I Use Water To Clean Roomba Sensors?
Avoid using water directly on roomba sensors as it may damage the sensitive components. Stick to dry cleaning methods.
Conclusion
Roomba sensors play a crucial role in ensuring the efficient performance of your robot vacuum. Regularly cleaning these sensors is essential to maintain their accuracy and prevent any obstacle detection issues. By following a simple step-by-step process, you can keep your roomba’s sensors in top shape and enhance its cleaning capabilities.
Start by removing any visible debris or dust from the sensors using a soft cloth or brush. Then, use a mild cleaning solution and gently wipe the sensors to remove any smudges or fingerprints. Remember to dry the sensors thoroughly to avoid moisture damage.
Besides preventing false obstacles, cleaning the roomba sensors will also contribute to the overall longevity of your device. By incorporating this simple maintenance routine into your cleaning schedule, you will ensure that your roomba continues to navigate through your home with ease, providing you with a cleaner and more convenient living environment.