Last Updated on August 7, 2025
To clean an oil painting, gently dust the surface with a soft, clean brush or cloth. Avoid using water or cleaning solutions.
Maintaining the beauty of an oil painting can be challenging, especially if it has been hanging on your wall for many years. Dust, dirt, and grime accumulate on the surface, making the colors appear dull and muddy. To preserve the vibrancy of your oil painting, it’s essential to clean it properly.
However, cleaning an oil painting is not as simple as washing a dirty dish. Using the wrong cleaning solution or technique can damage the painting and reduce its value. In this article, we’ll guide you through the steps on how to clean your oil painting without causing any harm.
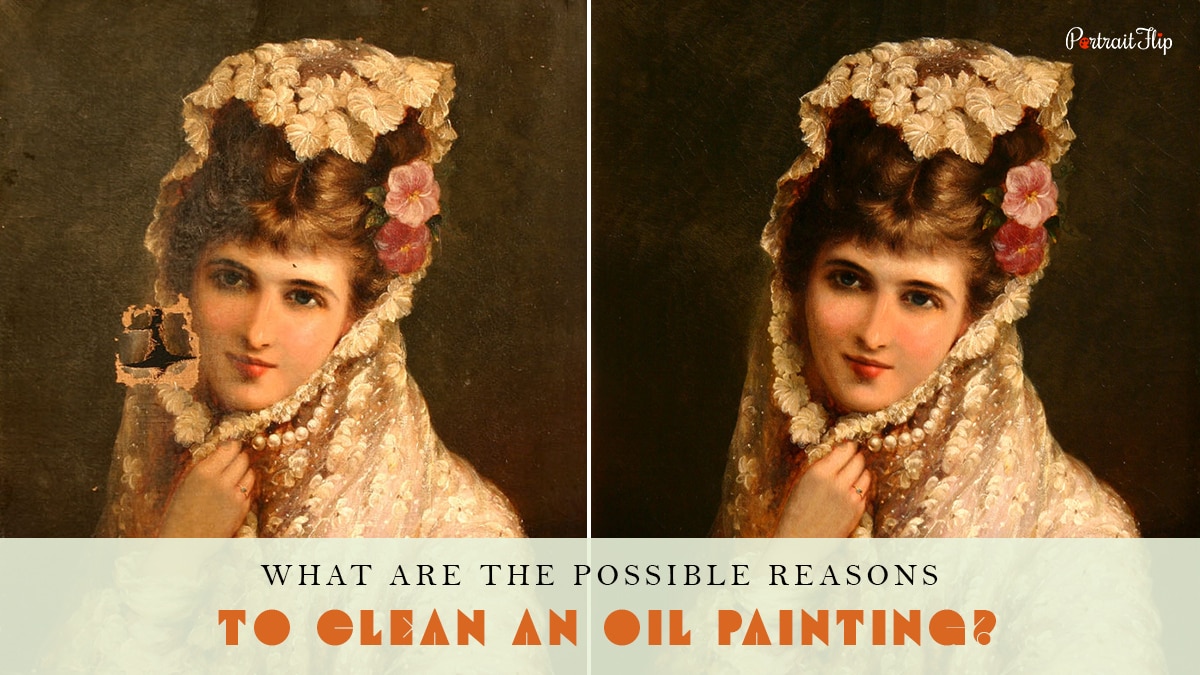
Credit: www.portraitflip.com
Understanding The Importance Of Cleaning Oil Paintings
Oil paintings are masterpieces that require extra care from art collectors or enthusiasts. They can last for centuries, provided that they are well-maintained and regularly cleaned. Cleaning oil paintings may seem like a daunting task, but it is a necessity to preserve the painting’s original beauty for many years.
Why Should You Clean Your Oil Paintings?
Cleaning your oil paintings has many benefits that can prolong its lifespan and preserve its original color and texture. Here are some reasons why you should clean your oil paintings:
- Dirt, dust, and grime can easily accumulate on the surface of oil paintings over time, which can cause the painting to darken and affect its color.
- Humidity and changes in temperature can cause the paint to crack or flake off.
- Exposure to sunlight or artificial light can cause damage to the painting, such as fading or yellowing of the paint.
- Restoration of oil paintings can be costly, so it is essential to maintain it regularly to avoid damages.
How Often Should You Clean Your Oil Paintings?
Cleaning frequency for oil paintings depends on how often they are exposed to dirt, dust, and humidity. Here are some factors that affect the cleaning schedule of oil paintings:
- Location: Paintings that are displayed in high-traffic areas or near doors and windows tend to accumulate more dirt and dust and, therefore, require more frequent cleaning.
- Humidity: Paintings that are glued onto their frames or exposed to high humidity need to be cleaned regularly.
- Age: Older oil paintings may have a dirtier appearance that needs more cleaning attention than newer pieces.
- Type of paint: Different types of paint require different cleaning methods; for example, a varnished painting needs less cleaning than an unvarnished one.
In general, it is best to clean your oil paintings at least every five years to remove accumulated dirt and dust.
Factors That Affect The Cleaning Schedule Of Oil Paintings
Before you clean your oil painting, take note of these factors that affect the cleaning schedule:
- The age and condition of the painting, including its framing, canvas, and paint.
- The type of dirt or grime on the painting that needs cleaning.
- The sensitivity of the paint to cleaning agents or solvents.
- The location and environmental conditions where the painting is displayed or stored.
When cleaning oil paintings, avoid using water or soap as these can damage the artwork. Use a soft-bristled brush, a lint-free cloth, or specialized cleaning solutions for oil paintings to ensure that the painting remains in good condition.
Cleaning oil paintings regularly is essential to preserve the artwork’s originality and beauty. Maintaining your oil paintings can liven up a home’s aesthetic appeal and keep your prized artwork in good condition for many years to come.
Preparing The Painting For Cleaning
Before cleaning an oil painting, it is essential to prepare it properly to avoid any damage. Here are some tips for the preparation process:
Identifying The Type Of Varnish On The Painting
Determining the type of varnish on your oil painting is crucial as it determines the cleaning method to be used. Here’s how to identify the varnish type:
- If the surface is greenish, it means the varnish is natural resin; if it’s yellowish, it is a synthetic varnish.
- Expose the area from the painting’s back and apply denatured alcohol to a cotton ball and rub it on it – if the cotton ball turns yellow, the varnish is natural resin; if it’s clear, it’s a synthetic varnish.
Tools And Materials Required For Cleaning
Having the right tools and materials for cleaning your oil painting is essential as using the wrong ones may damage it. Here are the materials you’ll need:
- Soft-bristled brushes of various sizes
- Distilled water
- Cotton gloves
- Cheesecloth
- Denatured alcohol
- Mild soap
- Paper towels
Tips For Properly Handling The Painting During Cleaning
While preparing for cleaning, it’s crucial to handle the painting carefully to avoid any damage. Here are some tips to help you handle the painting correctly:
- Ensure the painting is placed on a stable surface.
- Wear clean cotton gloves that fit well.
- Avoid placing the painting in direct sunlight as this can cause it to fade.
- Never spray water directly on the painting.
- Never use a hard-bristled brush to clean the painting as this may remove the paint.
By following these tips for preparing your oil painting for cleaning, you can be sure to clean it correctly and avoid any damage.
Different Methods Of Cleaning An Oil Painting
Oil paintings can add sophistication and elegance to any room. However, overtime, oil paintings tend to become dirty or dulled due to the accumulation of dirt and grime. Cleaning an oil painting may seem like a daunting task, but with the right methods, it can be done effectively and efficiently.
Here are the different methods of cleaning an oil painting.
Dry Cleaning Methods
Dry cleaning is the most basic method of cleaning an oil painting. This method works by removing accumulated dust and dirt build-ups on the painting. Two methods of dry cleaning are brushing and vacuuming.
Brushing
Brushing involves using soft-bristled brushes to remove accumulated dirt and dust from the surface of the oil painting. Here are the steps to follow when using the brushing method:
- Use a soft-bristled brush with goat hair or hogs’ hair. Avoid using synthetic brushes as they may scratch the surface of the painting.
- Start brushing from the top to the bottom of the painting.
- Brush gently in a single direction, avoiding circular motions.
- Brush from the center of the painting towards the edges.
- Brush the frame to remove accumulated dust and dirt.
Vacuuming
Vacuuming involves using a soft-bristled brush attachment for your vacuum cleaner. Here are the steps to follow when using the vacuuming method:
- Use a soft-bristled brush attachment for your vacuum cleaner.
- Turn off the beater bar to avoid damaging the surface of the painting.
- Move the attachment gently from left to right, starting from the top to the bottom.
- Always keep the attachment parallel to the surface of the painting.
- Vacuum the frame and the back of the painting to remove accumulated dust.
Wet Cleaning Methods
Wet cleaning methods are used to remove stubborn stains and dirt build-up from an oil painting. Two methods of wet cleaning are spot cleaning and surface cleaning.
Spot Cleaning
Spot cleaning involves cleaning only distinct areas of the painting that require cleaning. Here are the steps to follow when using the spot cleaning method:
- Apply a small amount of cleaning solvent to a cotton swab or soft cloth.
- Gently swab the affected area.
- Use another cotton swab or a soft cloth to dab the wet area until it’s dry.
- Repeat the process until the stain is removed.
Surface Cleaning
Surface cleaning involves cleaning the entire surface of the painting to remove dirt and grime buildup. Here are the steps to follow when using the surface cleaning method:
- Use a soft, lint-free cloth and dampen it with a cleaning solvent.
- Wipe the painting from top to bottom, being careful not to rub too hard.
- Use another dry soft, lint-free cloth to dry the surface of the painting.
- Repeat the process until the entire painting is cleaned.
Advanced Cleaning Methods
Advanced cleaning methods are used when the oil painting requires an intense cleaning session. Two advanced cleaning methods include enzyme cleaning and solvent cleaning.
Enzyme Cleaning
Enzyme cleaning involves using biological cleaning agents to break down and remove dirt and stains from the painting’s surface. Here are the steps to follow when using the enzyme cleaning method:
- Apply the biological cleaning agent to a soft cloth.
- Gently wipe the painting’s surface, being careful not to rub too hard.
- Use another soft, lint-free cloth to dry the surface of the painting.
- Repeat the process until the entire painting is cleaned.
Solvent Cleaning
Solvent cleaning is a harsh method and should only be used by professionals. This method involves using a highly volatile solvent to remove stains, dirt, and grime from the painting’s surface.
Cleaning an oil painting is an essential process that should be carried out every few years to maintain its beauty. It is important to exercise caution when cleaning an oil painting to avoid any damage. Follow the above methods to clean and protect your oil painting.
Step By Step Guide For Cleaning An Oil Painting
How to clean an oil painting: step by step guide for cleaning an oil painting
Oil paintings are adored for their classic, timeless beauty. However, over time, they may become tarnished as a result of exposure to dust, smoke, or other environmental pollutants. The good news is that cleaning them is quite easy, and you can do it yourself at home, with the right tools and preparation.
Below is a comprehensive step-by-step guide to help you clean an oil painting and get it looking as good as new!
Preparing The Work Area
Preparing the work area is an essential first step in the process of cleaning an oil painting. This step will help you minimize the risk of damage to the painting and make cleaning easier. Follow these steps for preparing the work area:
- Find a clean, dry, and well-ventilated area to work in.
- Place a clean, white cloth on your work surface to avoid any damage or stains to the painting.
- Wear gloves to prevent any oils, sweat, or dirt from your hands from transferring onto the painting.
Dry Cleaning The Painting
Dry cleaning is the first step in the actual cleaning process. This step primarily involves removing dust and other dry contaminants from the painting’s surface. Follow these steps for dry cleaning the painting:
- Use a soft-bristled brush to gently brush the surface of the painting in a circular motion. Start from the top of the canvas and work your way down.
- If the painting has heavy accumulations of dirt and dust, use a clean microfiber cloth to gently wipe the surface of the painting in a circular motion.
Wet Cleaning The Painting
Wet cleaning is the second step in the actual cleaning process. It involves the use of solvents to remove any stubborn stains and grime from the painting’s surface. Here’s how to go about wet cleaning the painting:
- Dampen a clean white cloth with distilled water.
- Wring out the cloth until it’s almost dry.
- Gently rub the damp cloth onto the surface of the painting using circular motions.
Drying The Painting
Drying the painting is the next crucial step in the process. It ensures that no moisture remains on the surface of the painting, which could harm it. Here’s how to go about drying the painting:
- Use a clean, dry towel or cloth to gently dab the surface of the painting to absorb any remaining moisture.
- Allow the painting to air dry completely before storing it.
Re-Varnishing The Painting
Re-varnishing is an optional but crucial step in maintaining the longevity of the oil painting. It helps to restore the painting’s vibrancy and protect it from future damage. Here are the steps to follow when re-varnishing the painting:
- Use a clean brush to apply a thin coat of varnish onto the surface of the painting.
- Allow the varnish to dry before applying additional coats.
- Repeat this process until you attain the desired sheen level.
Cleaning an oil painting isn’t rocket science, but it requires carefulness and adherence to the right techniques and preparations. Following this step-by-step guide should have your artwork looking as good as new in no time. Remember always to be gentle and patient in all your cleaning processes to avoid any damage to your priceless art pieces.
Frequently Asked Questions On How To Clean An Oil Painting?
How Often Should I Clean My Oil Painting?
Ideally, it is recommended to clean oil paintings every 5-10 years or whenever grime or dust accumulates.
What Should I Use To Clean My Oil Painting?
You can mix equal parts of distilled water and denatured alcohol to clean your oil painting. Alternatively, consult an expert conservator.
Can I Use Regular Household Cleaners To Clean My Oil Painting?
No, household cleaners can damage the oil painting’s delicate surface. It’s best to consult an expert conservator for the right cleaning method.
How Can I Remove Smoke Or Nicotine Stains From My Oil Painting?
Mix denatured alcohol and distilled water in equal parts and gently dab the solution with a clean cloth on the affected area.
What Are Some Tips To Maintain My Oil Painting After Cleaning?
Avoid exposure to direct sunlight or extreme temperatures. Use a gentle brush or cloth to remove dust and grime regularly.
Conclusion
After reading this comprehensive guide on how to clean an oil painting, you can now confidently take care of your precious artwork without any fear of damaging it. Remember, prevention is better than cure, so avoid exposing your paintings to extreme temperatures, humidity, or direct sunlight.
Always use soft and clean brushes or sponges, and avoid harsh chemicals, including water, alcohol, or vinegar. If you’re not sure how to handle a particular cleaning task, seek professional help from a conservator or specialist. Finally, remember to be patient, gentle, and cautious when cleaning an oil painting.
Your patience and efforts will definitely pay off with a restored and beautiful artwork that will last for generations. Happy cleaning!