Last Updated on November 16, 2025
To adjust a riding mower carburetor, follow these steps: clean the carburetor, locate the adjustment screws, adjust the low-speed and high-speed screws, and test the adjustments. Adjusting a riding mower carburetor involves cleaning the carburetor to remove any debris or build-up, locating and adjusting the idle, low-speed, and high-speed screws to achieve the correct fuel mixture, and testing the adjustments to ensure optimal performance.
Credit: www.briggsandstratton.com
Symptoms Of A Malfunctioning Carburetor
A malfunctioning carburetor can exhibit various symptoms, such as engine stalling, rough idling, or poor acceleration. Learning how to adjust a riding mower carburetor can help restore smooth operation and enhance overall performance. Regular maintenance and tuning are essential for optimal functioning.
When it comes to the smooth operation of a riding mower, the carburetor plays a crucial role. A malfunctioning carburetor can lead to various issues, including engine running rough, difficulty starting the mower, and engine stalling or surging. Identifying these symptoms early on can help you address the problem promptly and keep your mower running smoothly.
Let’s take a closer look at each symptom and what it signifies:
Engine Running Rough
- Uneven engine idling: If your riding mower’s engine is running rough and idling unevenly, it may be a sign of a malfunctioning carburetor.
- Loss of power: A carburetor issue can cause the engine to lose power while mowing, resulting in uneven cutting and an overall unsatisfactory performance.
- Backfiring: An improperly adjusted carburetor can lead to backfiring, which is characterized by loud popping sounds coming from the exhaust.
- Poor fuel efficiency: A carburetor that is not functioning optimally can lead to increased fuel consumption, diminishing the mower’s fuel efficiency.
Difficulty Starting The Mower
- Hard or slow starting: If your riding mower is taking multiple attempts to start or has a delayed startup, it could be due to an issue with the carburetor.
- Engine flooding: A carburetor that is flooding the engine with too much fuel can make the starting process even more challenging as it creates a rich fuel-air mixture.
- Engine not starting at all: In severe cases, a malfunctioning carburetor may prevent the engine from starting altogether, requiring immediate attention and repairs.
Engine Stalling Or Surging
- Engine stalling: A faulty carburetor can cause the engine to stall while in use, interrupting the mowing operation and causing inconvenience.
- Engine surging: If your mower’s engine randomly speeds up and slows down without your input, it might be due to an erratic fuel mixture caused by an improperly adjusted carburetor.
- Inconsistent performance: A carburetor issue can lead to inconsistent engine performance, resulting in frequent surging or stalling during operation.
To avoid these problems, regular maintenance and adjustment of the riding mower’s carburetor are essential. Understanding the symptoms of a malfunctioning carburetor can help you identify and address the issue promptly, ensuring your mower operates smoothly and efficiently.
Preparing To Adjust The Carburetor
Adjusting the carburetor on your riding mower is essential for optimal performance. Follow these simple steps to ensure smooth operation and maximize fuel efficiency.
Adjusting the carburetor of your riding mower can greatly improve its performance and fuel efficiency. Before you begin, it is important to gather the necessary tools and materials to ensure a smooth adjustment process. Additionally, taking safety precautions is crucial to prevent accidents and injuries.
Here’s how you can prepare to adjust your riding mower’s carburetor:
Gathering Necessary Tools And Materials:
- A screwdriver (usually a flathead or Phillips-head)
- A pair of pliers
- A clean cloth or rag
- A carburetor cleaner spray
- A replacement carburetor gasket (if needed)
Ensuring Safety By Disconnecting The Spark Plug:
- Locate the spark plug wire and pull it gently to disconnect it from the spark plug. This will prevent the mower from starting accidentally during the adjustment process.
- Ensure that the disconnected spark plug wire is kept away from the spark plug itself to avoid any potential ignition.
- Take caution when working around the mower’s engine to prevent burns or other injuries.
Remember, safety should always be your top priority when working on any machinery. Now that you have gathered the necessary tools and disconnected the spark plug, you are ready to proceed with adjusting the carburetor of your riding mower.
Step-By-Step Guide To Adjusting The Carburetor
Learn how to adjust the carburetor on your riding mower with this step-by-step guide. Easily tune your mower’s performance for optimal fuel mix and engine efficiency.
Locating the carburetor on your riding mower:
- The first step in adjusting the carburetor of your riding mower is to locate the carburetor itself. The carburetor is typically located on the side or front of the engine, and it is connected to the air filter and fuel line.
- Consult your riding mower’s user manual to ensure you are looking at the correct component and to familiarize yourself with its specific location.
Identifying the adjustment screws and their functions:
- Once you have located the carburetor, you will find three main adjustment screws: The idle speed screw, high-speed mixture screw, and low-speed mixture screw.
- The idle speed screw controls the engine’s idle speed when it is not under load.
- The high-speed mixture screw regulates the air-fuel mixture at higher engine speeds.
- The low-speed mixture screw adjusts the air-fuel mixture at lower engine speeds.
Determining the initial settings for the screws:
- Before making any adjustments, take note of the current positions of the adjustment screws. This will allow you to return to the original settings if needed.
- For the idle speed screw, turn it clockwise until it lightly contacts the throttle linkage, then turn it counterclockwise 1 to 2 turns.
- For the high-speed mixture screw and low-speed mixture screw, turn them clockwise until they lightly seat, then back them out counterclockwise 1 to 1.5 turns.
Starting the engine and letting it warm up:
- Start the engine of your riding mower and let it run for a few minutes to warm up. This ensures that the engine is at its operating temperature before making any adjustments to the carburetor.
Adjusting the idle speed screw:
- To adjust the idle speed, locate the idle speed screw on the carburetor.
- Turn the idle speed screw clockwise to increase the idle speed or counterclockwise to decrease it.
- Make small adjustments and monitor the engine’s idle speed until it is running smoothly without stalling.
Adjusting the high-speed mixture screw:
- Locate the high-speed mixture screw on the carburetor and adjust it using a screwdriver.
- Turn the screw clockwise to make the mixture leaner or counterclockwise to make it richer.
- Fine-tuning the high-speed mixture ensures optimal performance at higher engine speeds.
Fine-tuning the low-speed mixture screw:
- Find the low-speed mixture screw on the carburetor and make adjustments using a screwdriver.
- Turn the screw clockwise to make the mixture leaner or counterclockwise to make it richer.
- Fine-tuning the low-speed mixture ensures efficient performance at lower engine speeds.
Testing the adjustments and making further tweaks if needed:
- After adjusting the carburetor, test your riding mower to ensure it is running smoothly.
- Monitor the engine’s performance, including idle speed, acceleration, and overall power.
- If necessary, make further adjustments to the idle speed screw, high-speed mixture screw, or low-speed mixture screw until you achieve optimal performance.
By following this step-by-step guide, you can adjust the carburetor on your riding mower and optimize its performance. Keep in mind that the specific steps may vary depending on the model and manufacturer of your riding mower, so always consult your user manual for detailed instructions.
Happy mowing!
Tips And Best Practices For Adjusting The Carburetor
Adjusting the carburetor on a riding mower requires careful attention to detail. Follow these tips and best practices to ensure the proper adjustment for optimal performance.
When it comes to maintaining and optimizing the performance of your riding mower, one important aspect to consider is the adjustment of its carburetor. The carburetor plays a crucial role in regulating the air and fuel mixture that powers the engine.
If it’s not properly adjusted, your mower may experience issues such as poor fuel efficiency, rough idling, or difficulty starting. To help you make the necessary adjustments with ease, here are some tips and best practices to keep in mind:
Taking Notes Of Initial Settings And Changes Made
Before diving into the carburetor adjustment process, it’s essential to take notes of the initial settings and any changes you make along the way. This record will serve as a reference point, enabling you to revert to previous settings if needed.
When jotting down the settings, you should focus on:
- The position of the idle adjustment screw
- The position of the main mixture adjusting screw
- Any changes made to the idle speed or mixture settings
By keeping track of these details, you can easily troubleshoot issues and revert any changes that don’t yield the desired results.
Making Small And Gradual Adjustments
When adjusting the carburetor, it’s important to remember that small and gradual changes are key. This allows you to fine-tune the air and fuel mixture without causing drastic fluctuations in performance. Here’s how you should approach adjustment:
- Start with the idle adjustment screw: Turn it clockwise to increase idle speed and counterclockwise to decrease it.
- Move on to the mixture adjusting screw: Also known as the fuel mixture screw, turning it clockwise will make the mixture leaner, while turning it counterclockwise will make it richer.
- Make one adjustment at a time: After each adjustment, wait for the mower to stabilize before proceeding to the next one. This gives you a chance to observe the impact of each change.
Remember, patience is key. By making small and gradual adjustments, you can achieve optimal performance without risking damage to your riding mower.
Keeping The Air And Fuel Filters Clean
To maintain a properly functioning carburetor, it’s crucial to keep the air and fuel filters clean. A clogged or dirty filter can disrupt the air and fuel flow, leading to poor performance and potentially damaging the carburetor. Follow these steps to ensure the filters are clean:
- Air filter maintenance: Regularly inspect the air filter and clean or replace it as necessary. This will prevent debris and dust from entering the carburetor. Refer to your mower’s manual for specific instructions on filter maintenance.
- Fuel filter maintenance: Check the fuel filter periodically and replace it if it’s dirty or clogged. A clean fuel filter ensures a steady flow of fuel to the carburetor, contributing to its proper functioning.
By keeping the filters clean, you can minimize the likelihood of carburetor issues and prolong the lifespan of your riding mower.
Regularly Maintaining The Riding Mower’S Carburetor
Apart from making adjustments, regular maintenance of the carburetor is essential for its overall performance and longevity. Incorporate these practices into your routine:
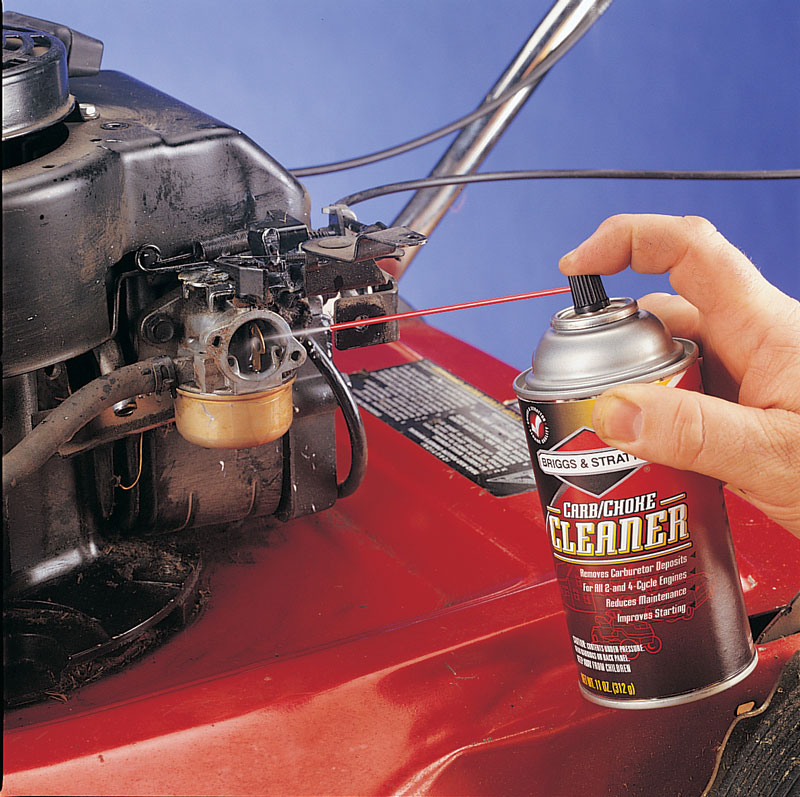
- Clean the carburetor: Remove any dirt, debris, or grime using a carburetor cleaner and a brush. Pay special attention to the small orifices and passages.
- Inspect for wear or damage: During cleaning, inspect the carburetor for any signs of wear or damage, such as corrosion or cracked gaskets. Replace any damaged components promptly.
- Check the gaskets: Ensure that all gaskets are in good condition and properly sealed. Faulty gaskets can result in air leaks, affecting the air and fuel mixture.
By regularly maintaining your riding mower’s carburetor, you can optimize its performance and prolong its lifespan, ensuring a smooth and reliable mowing experience.
Remember, adjusting the carburetor requires patience and attention to detail. By following these tips and best practices, you can confidently make the necessary adjustments to enhance your riding mower’s performance. Happy mowing!
Frequently Asked Questions On How To Adjust A Riding Mower Carburetor?
How Do You Adjust The Air Fuel Mixture On A Lawn Mower?
To adjust the air fuel mixture on a lawn mower, locate the carburetor and adjust the screw.
How Do I Know If My Carburetor Needs Adjusting?
To determine if your carburetor needs adjusting, observe signs of a rich or lean fuel mixture, such as rough idle, poor acceleration, or black/white smoke from exhaust.
How To Adjust Carburetor Mixture Screws On Briggs And Stratton?
To adjust carburetor mixture screws on a Briggs and Stratton engine, follow these steps: 1. Locate the mixture screws near the carburetor. 2. Start the engine and let it warm up. 3. Turn the screws clockwise until they are lightly seated.
4. Slowly turn them counterclockwise to find the smoothest idle. 5. Once you find the smoothest idle, turn the screws clockwise slightly to enrich the mixture. 6. Check the idle again and make further adjustments if necessary. 7. Repeat the process until you achieve optimal performance and smooth running.
How Do You Adjust An Air Mixture Screw?
To adjust an air mixture screw, follow these steps: 1. Locate the air mixture screw on your device. 2. Use a screwdriver to turn the screw clockwise for a richer air mixture or counterclockwise for a leaner mixture. 3. Make small adjustments and test the device’s performance.
4. Continue adjusting until you achieve the desired air mixture.
How Do You Adjust A Riding Mower Carburetor?
To adjust a riding mower carburetor, locate the adjustment screws on the carburetor and turn them clockwise to increase or counterclockwise to decrease the fuel mixture.
Conclusion
To conclude, adjusting a riding mower carburetor is a critical task for maintaining the optimal performance of your mower. By following the step-by-step instructions outlined in this blog post, you can ensure that your carburetor is properly aligned and delivering the right fuel-to-air ratio.
Remember to consult your mower’s manual for specific details and settings. Regularly adjusting the carburetor will enhance the engine’s efficiency and prevent problems such as poor fuel economy, stalling, and rough running. Taking the time to inspect and clean the carburetor parts, adjusting the idle and main screws, and troubleshooting any potential issues will give you a smooth and reliable cutting experience.
By mastering this skill, you can save money on repair costs and extend the lifespan of your riding mower. Keep in mind that this process requires patience and attention to detail, so take your time and go through the steps in an organized manner.
Maintaining a properly adjusted riding mower carburetor will ensure that your lawn is beautifully manicured all season long. So go ahead, grab your tools, and give your mower the attention it deserves!