Last Updated on January 15, 2025
Contouring older faces requires a strategic application of makeup to enhance features and create a youthful appearance. As we age, our skin undergoes natural changes such as sagging and loss of elasticity.
These changes can affect the structure of the face, making it necessary to adjust our makeup techniques. Contouring is a popular makeup technique that involves the use of light and dark shades to create shadows and highlights, thereby sculpting the face.
However, when contouring older faces, it is essential to approach it with a few key considerations in mind. This article will guide you through the process of contouring older faces, offering tips and tricks to achieve a natural and youthful effect. So, if you are looking to enhance your features and bring out the best in your face, read on to discover the secrets of contouring older faces.
The Changes In Older Faces
As we age, our faces undergo various changes due to natural factors such as loss of elasticity and collagen, thinning of the skin, decreased facial volume, and the formation of fine lines and wrinkles. These changes can impact the way makeup application techniques, like contouring, work on older faces. To achieve a flawless contour on an older face, it is important to understand these changes and adjust our techniques accordingly. In this article, we will explore these changes in more detail, guiding you on how to contour older faces effectively.
Loss of Elasticity and Collagen
One of the primary changes that occur in older faces is the loss of elasticity and collagen in the skin. Collagen, a protein that provides strength and structure to the skin, gradually decreases as we age, leading to sagging and drooping in certain areas. Additionally, the loss of elasticity makes the skin less able to bounce back, resulting in a loss of firmness and a more tired appearance.
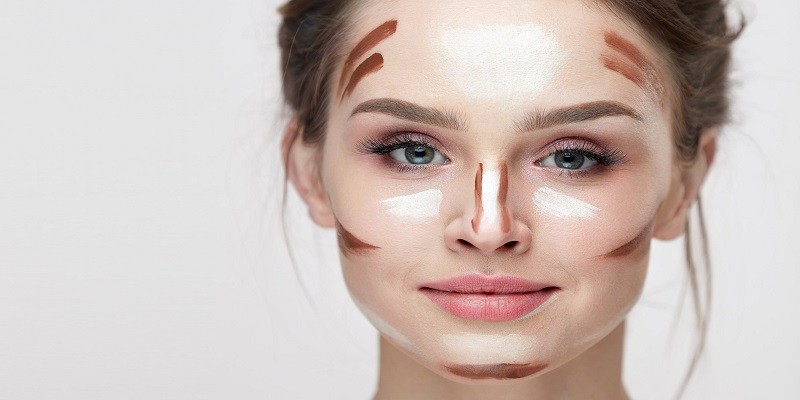
To address this, contouring on older faces should focus on lifting and defining the facial features. By strategically applying darker shades to areas that need a lift, such as the jawline and cheekbones, and lighter shades to areas that need to be highlighted, like the forehead and under the eyes, we can create a more youthful and lifted appearance.
Thinning of the Skin
Another change that occurs with age is the thinning of the skin. As we get older, the skin becomes thinner and more fragile, making it more susceptible to bruising and damage. This can make contouring techniques that involve heavy blending or harsh lines less suitable for older faces.
To adapt to this change, opt for a softer approach to contouring. Use cream or liquid-based contour products that blend seamlessly into the skin, avoiding any harsh lines. A light touch and gentle blending will help create a natural-looking contour without emphasizing the thinness of the skin.
Decreased Facial Volume
With age, the face gradually loses volume, particularly in areas such as the cheeks and temples. This loss of facial volume can result in a flatter and less defined appearance.
To address this, contouring on older faces should prioritize adding volume back to the face. Opt for cream or liquid-based contour products that have a slightly thicker consistency. Apply these products to areas that have lost volume, such as the hollows of the cheeks or temples, and blend them carefully to create a more defined and lifted look.
Formation of Fine Lines and Wrinkles
As we age, fine lines and wrinkles begin to appear on the face due to a combination of factors such as decreased collagen production and repetitive facial movements. These fine lines and wrinkles can be accentuated by traditional contouring techniques that involve heavy powders or bold lines.
To work with these changes, consider using products with a more lightweight and hydrating formula. Opt for cream or liquid-based contour products that will not settle into fine lines or creases. Apply these products with a light hand, using a small brush or sponge, and blend thoroughly to create a natural-looking contour that does not emphasize the fine lines and wrinkles.
Contouring older faces requires an understanding of the changes that occur with age. By adapting our techniques to accommodate the loss of elasticity and collagen, thinning of the skin, decreased facial volume, and the formation of fine lines and wrinkles, we can achieve a youthful and natural-looking contour. Remember to focus on lifting and defining the features, using softer approaches and techniques, and prioritizing the addition of volume. With these adjustments, you can confidently contour an older face and enhance its natural beauty.

Credit: www.pinterest.com
Choosing The Right Products
Contouring is a popular makeup technique that adds definition and dimension to the face. When it comes to contouring older faces, it is essential to choose the right products that work well with mature skin. By selecting the appropriate contour products, you can achieve a natural and youthful look.
Cream-based vs. Powder-based Contour Products
One of the first decisions to make when contouring an older face is whether to use cream-based or powder-based contour products. Both options have their benefits, so it ultimately comes down to personal preference and skin type. Here’s what you need to know:
Cream-based Contour Products
Cream-based contour products are a great choice for mature skin as they blend seamlessly and provide a more natural finish. They tend to have a smoother texture, making them easier to work with, especially on drier skin. Cream-based contour products are also buildable, allowing you to achieve the desired level of intensity. When applying cream-based products, consider using a damp beauty sponge or a dense brush for a flawless application.
Powder-based Contour Products
Powder-based contour products, on the other hand, offer a longer-lasting effect and are ideal for those with oilier skin. These products are versatile and can be easily layered for a more dramatic look. When applying powder-based contour products, opt for a fluffy brush and use gentle stroking motions to blend the product seamlessly into the skin.
Shades that Complement Mature Skin Tones
Choosing the right shades for contouring older faces is crucial to achieving a natural and flattering result. Here are some tips to help you find the perfect shade:
- For fair or light skin tones, look for contour shades that have a cool undertone, such as taupe or light brown. Avoid going too dark as it can look unnatural.
- For medium skin tones, opt for contour shades that have a neutral or warm undertone. Shades like warm cocoa or caramel can add depth without looking harsh.
- For deeper skin tones, choose contour shades that have rich undertones, such as deep browns or mahogany. Avoid going too light, as it can appear ashy or grayish.
Avoiding Shimmery and Glittery Formulas
When contouring older faces, it’s best to steer clear of shimmery and glittery formulas. These types of products can draw attention to fine lines and wrinkles, making them more noticeable. Opt for matte or satin finishes instead, as they provide a more natural and youthful look. Matte contour products create shadows, while satin finishes add a subtle glow without emphasizing texture.
Choosing the right contour products is essential when contouring older faces. Whether you prefer cream-based or powder-based products, selecting shades that complement your mature skin tone and avoiding shimmery formulas will help you achieve a natural and flattering contour. Experiment with different techniques and products to find what works best for your unique facial features.
Prepping The Skin
The key to achieving a flawless contour on older faces is to ensure that the skin is prepped properly. By taking the time to cleanse, moisturize, apply primer, and use a hydrating setting spray, you can create a smooth and even base for your contouring products. In this section, we will explore each step in detail, beginning with the cleanse and moisturize process.
Cleanse and Moisturize
Before applying any makeup, it is crucial to start with a clean canvas. Begin by using a gentle cleanser to remove any dirt, oil, or impurities from your skin. Look for a cleanser that is suitable for your specific skin type, whether it’s dry, oily, or combination.
After cleansing, follow up with a moisturizer that is rich and hydrating. This step is particularly important for older skin, as it tends to be more prone to dryness. Choose a moisturizer that contains ingredients like hyaluronic acid or ceramides to help plump and nourish the skin.
Applying Primer for a Smooth Base
Once your skin is clean and moisturized, it’s time to apply a primer. Primer not only helps to extend the longevity of your makeup, but it also creates a smooth surface for your contour products to adhere to. When choosing a primer, opt for one that is silicone-based, as it will help fill in any fine lines or wrinkles, giving your skin a more youthful appearance.
To apply the primer, take a small amount and blend it evenly over your entire face, paying close attention to areas where you will be applying contour, such as the cheeks, forehead, and jawline. Allow the primer to set for a few minutes before moving on to the next step.
Using a Hydrating Setting Spray
After you have completed your contouring, it’s essential to set your makeup to ensure it lasts throughout the day. However, instead of using a regular setting spray, opt for a hydrating setting spray. This will not only help lock your contour in place but also add a boost of hydration to your skin, giving it a fresh and radiant appearance.
To use the hydrating setting spray, hold the bottle at arm’s length and mist it over your entire face, making sure to cover all areas where you have applied contour. Allow the setting spray to dry naturally, and you’re ready to show off your beautifully contoured face!
Mapping The Face
Contouring is a powerful makeup technique that can enhance and define the natural features of any face. However, when it comes to contouring for older faces, mapping the face becomes even more crucial. By understanding the individual facial structure and bone structure, determining the areas to highlight and contour, and adjusting the technique for each unique face shape, you can achieve an age-defying and glamorous look. In this blog post, we will guide you through these essential steps to help you master the art of contouring on older faces.
Identifying Facial Structure and Bone Structure
The first step in contouring older faces is to identify the facial structure and bone structure. As we age, our skin loses its elasticity, and our facial structure can change. It’s important to take note of these changes to create a more youthful appearance through contouring. To identify the facial structure, start by looking at your face in a well-lit environment and observe the natural lines and curves. Pay attention to areas that may have lost volume, such as the cheeks or temples, as these areas would benefit from contouring with a darker shade.
A great way to identify bone structure is to gently feel your face with your fingertips. With a gentle touch, you can locate the prominent bones that provide the foundation for your facial structure. These are typically the cheekbones, jawline, and forehead. By highlighting and contouring these specific areas, you can create the illusion of more defined and sculpted features, making your face appear more youthful.
Determining Areas to Highlight and Contour
Once you have identified the facial and bone structure, it’s time to determine the areas to highlight and contour. Highlighting involves using a lighter shade of makeup to bring forward specific features, while contouring uses a darker shade to create shadows and add depth. For older faces, it’s important to balance the highlighting and contouring to achieve a natural-looking result.
Areas to highlight typically include the center of the forehead, the bridge of the nose, the under-eye area, and the top of the cheekbones. By focusing on these areas, you can brighten and lift the face, giving it a more youthful appearance. On the other hand, areas to contour often include the temples, the hollows of the cheeks, the jawline, and the sides of the nose. Contouring these areas helps to create a more defined and sculpted look.
Adjusting Technique for Each Individual Face Shape
Every face shape is unique, and the contouring technique should be adjusted accordingly. There are various face shapes, such as oval, round, square, heart, and diamond. To determine your face shape, start by pulling your hair back and looking in the mirror. Pay attention to the widest part of your face and how your features are proportioned.
For example, if you have an oval face shape, you can focus on enhancing your cheekbones and adding definition to the jawline. On the other hand, if you have a round face shape, you may want to contour the sides of your face to create a more elongated appearance. By understanding your face shape and adjusting the contouring technique, you can accentuate your best features and achieve a more youthful look.
Contouring older faces requires a careful mapping of the face to identify the facial structure and bone structure. From there, you can determine the areas to highlight and contour, adjusting the technique based on each unique face shape. By following these steps and practicing, you can confidently master the art of contouring and achieve a naturally glamorous look at any age.
Blending Techniques For A Natural Look
When it comes to contouring older faces, the key is to achieve a natural look that enhances your features without appearing too harsh or unnatural. Blending techniques play a crucial role in achieving this goal. By properly blending your contour lines, you can create a subtle and youthful look that lifts and defines your face. In this article, we will explore three important blending techniques that will help you achieve a flawless and natural contour.
Buffing and Blending Contour Lines
To achieve a natural-looking contour on older faces, buffing and blending contour lines are essential techniques to master. Buffing refers to the act of blending your contour product onto your skin using circular motions with a brush or sponge. This technique helps to soften the edges of your contour lines, allowing them to seamlessly melt into your skin for a more natural appearance.
When it comes to blending, the key is to use light and gentle strokes to blend your contour into your foundation or base makeup. This technique ensures that there are no harsh lines or distinct edges, giving your contour a subtle and blended effect. Take your time and blend carefully, focusing on areas where you want to create definition, such as your cheekbones, jawline, and temples.
Gradual Build-Up of Product
Avoid applying a heavy hand when contouring older faces. Instead, opt for a gradual build-up of product to achieve a more natural look. Start by applying a small amount of contour product and then gradually build up the intensity as desired. This approach allows you to have more control over the final result, preventing your contour from looking too overpowering or unnatural.
Remember, less is more when it comes to contouring mature skin. It is better to start with a subtle contour and then add more product if necessary, rather than applying too much product right from the beginning. By gradually building up the product, you can easily achieve a youthful and natural-looking contour that enhances your features without overwhelming them.
Avoiding Harsh Lines and Edges
Avoiding harsh lines and edges is crucial for achieving a natural contour on older faces. Harsh lines can make your contour appear heavy and unflattering, emphasizing fine lines and wrinkles. To avoid this, make sure to blend your contour lines thoroughly, as mentioned earlier.
In addition to proper blending, using the right tools can also help you achieve a softer and more seamless contour. Opt for a brush or sponge specifically designed for blending to ensure a smooth and even application. These tools help to diffuse the product and blend it seamlessly with your foundation, creating a flawless and naturally contoured look.
Furthermore, consider using a cream or liquid contour product instead of powder. Cream and liquid formulations tend to blend more seamlessly into the skin, reducing the chances of harsh lines and edges. These formulations also provide a more natural and dewy finish, which is ideal for mature skin.
Blending techniques are essential for achieving a natural and youthful contour on older faces. By buffing and blending your contour lines, gradually building up the product, and avoiding harsh lines and edges, you can create a seamlessly blended contour that brings out the best in your features. Remember to take your time, be gentle in your application, and select the right tools and products for a flawless and natural look.
Highlighting The Key Features
Highlighting the key features is an essential technique when it comes to contouring older faces. By strategically placing highlights on specific areas, you can create a more youthful and lifted appearance. In this article, we’ll explore three key features that can benefit from highlighting: lifting the cheekbones, brightening under the eyes, and enhancing the brow bone.
Lifting the Cheekbones
One of the most effective ways to achieve a youthful look is by lifting the cheekbones. As we age, our cheekbones tend to lose definition and appear less prominent. However, with the right contouring technique, you can create the illusion of lifted cheekbones.
To lift the cheekbones, start by using a contour shade that is slightly darker than your natural skin tone. Apply the contour shade along the hollows of your cheeks, blending it upwards towards your temples. This will create a subtle shadow that helps to visually lift the cheekbones. To further enhance the effect, apply a highlight shade on top of the cheekbones. The highlight shade should be lighter than your natural skin tone and should be applied on the highest points of the cheekbones. This will draw attention to the lifted area, creating a more youthful appearance.
Brightening Under the Eyes
Brightening under the eyes is another key feature to focus on when contouring older faces. Dark circles under the eyes can make the face look tired and aged. By brightening this area, you can instantly rejuvenate your appearance.
To brighten under the eyes, use a concealer that is one to two shades lighter than your natural skin tone. Apply the concealer in an upside-down triangle shape, with the base of the triangle under the eyes and the point towards the outer corners of the eyes. This technique helps to brighten and lift the under-eye area. Blend the concealer gently with a damp beauty sponge or your fingertips for a seamless finish. If needed, set the concealer with a translucent powder to ensure long-lasting wear.
Enhancing the Brow Bone
Enhancing the brow bone is a simple yet powerful technique to add structure and definition to the face. As we age, the brow bone can become less pronounced, resulting in a droopy appearance. However, with proper contouring, you can enhance the brow bone and create a more lifted look.
To enhance the brow bone, use a matte highlight shade that is lighter than your natural skin tone. Apply the highlight shade directly under the arch of the eyebrows and blend it out towards the tail of the brows. This technique will create a subtle lift and draw attention to the brow bone. To further define the brows, use a brow pencil or powder to fill in any sparse areas and shape the brows according to your desired look.
By focusing on these key features and using the right contouring techniques, you can transform your older face and achieve a more youthful appearance. Remember to blend well and use shades that complement your natural skin tone for the most seamless and natural-looking results.
Contouring To Add Definition
Contouring is a powerful makeup technique that can work wonders on older faces. By strategically shading and highlighting different areas of the face, you can create the illusion of a more youthful and sculpted look. One of the primary goals of contouring for older faces is to add definition, which helps to counteract the natural loss of volume and softness that comes with age.
Defining the Jawline and Neck
The jawline and neck are areas that tend to lose definition as we age. However, with the right contouring techniques, you can bring back that youthful sharpness and sculpted look. To define the jawline, it’s important to choose a contour shade that is slightly darker than your natural skin tone. Using a small angled brush, apply the contour shade along the jawline, starting from the ears and blending downwards. This creates a shadow effect, which gives the appearance of a more chiseled jawline.
For the neck, apply a thin line of contour shade along the area where the jawline meets the neck. Blend it well to create a seamless transition between the face and the neck, avoiding any harsh lines. This technique helps to visually lift the neck and create a more defined look.
Slimming Down the Nose
The nose is another area where contouring can make a significant difference in adding definition to the face. If you want to slim down your nose, choose a cool-toned contour shade that is slightly darker than your natural skin tone. Start by applying the contour shade to the sides of the bridge of your nose, using a small brush or a makeup sponge. Blend it well along the sides, taking care to leave the center of the nose lighter. This creates depth and gives the illusion of a slimmer nose.
Additionally, you can apply a highlight shade down the center of your nose, focusing on the bridge and the tip. This helps to bring attention to the center of the face and further enhances the slimming effect. Remember to blend the highlight shade seamlessly with the contour shade for a natural-looking result.
Softening the Forehead
The forehead is an area that can show signs of aging, such as lines and wrinkles. Contouring can help soften the appearance of these lines and create a more youthful look. To contour the forehead, choose a shade that is slightly darker than your natural skin tone. Using a fluffy brush, apply the contour shade to the temples and along the hairline, blending it well for a seamless effect.
In addition to contouring, highlighting the center of the forehead can also create a more lifted and radiant look. Choose a highlight shade that matches your skin tone and apply it to the center of the forehead, blending it with the contour shade. This technique helps to bring light to the center of the face and diminish the appearance of lines on the forehead.
Remember, contouring is all about creating balance and enhancing your natural features. Practice different techniques and find what works best for your face shape and desired look. With a little practice and the right products, you can achieve a beautifully contoured face that adds definition and youthfulness to your overall appearance.
Finishing Touches For A Flawless Look
Achieving a flawless contour on older faces requires extra attention to detail and the right finishing touches. With the right techniques and products, you can enhance your facial features and create a naturally sculpted look. In this section, we’ll delve into the important steps for perfecting your contour and achieving a flawless finish. From setting the contoured areas to selecting the right blush and highlighter, we’ll cover all the essential aspects that will elevate your contouring game.
Setting the Contoured Areas
Setting the contoured areas is a crucial step in ensuring that your hard work lasts all day. After applying your contour product, lightly dust a translucent powder over the contoured areas using a fluffy brush. This will help to set the cream or powder products and prevent them from fading or smudging throughout the day. Make sure to focus on the areas where you applied the contour, such as the hollows of your cheeks, jawline, and forehead. This simple step will help to create a long-lasting and flawless contour.
Choosing the Right Blush and Highlighter
Selecting the perfect blush and highlighter can make all the difference in achieving a natural and youthful glow. For older faces, it’s best to opt for cream-based products rather than powder formulas, as they tend to blend more seamlessly and provide a natural radiance. Choose a blush shade that complements your skin tone and apply it to the apples of your cheeks, gently blending upwards towards the temples. When it comes to highlighter, go for a subtle shade that imparts a soft sheen rather than an intense shimmer. Apply it to the high points of your face, such as the cheekbones, brow bones, and down the bridge of your nose, for a luminous and youthful glow.
Adding a Natural Glow to the Skin
To enhance the overall radiance of your contour, adding a natural glow to the skin is the final touch. Start by ensuring your skin is well-hydrated and moisturized, as this will create a smooth canvas for your makeup application. Then, choose a lightweight luminizing primer or a liquid illuminator with a subtle hue that complements your skin tone. Apply it to the high points of your face before foundation, blending it gently for a seamless glow. This will help to create a youthful and radiant base for your contour, enhancing the overall effect and ensuring a flawless, lit-from-within look.
Frequently Asked Questions Of How To Contour Older Faces?
How Does Contouring Help Older Faces?
Contouring helps to define and enhance features, giving a more youthful appearance to older faces.
What Are The Best Products For Contouring Mature Skin?
Cream-based products are ideal for contouring mature skin as they blend seamlessly and provide a natural-looking finish.
Which Areas Of The Face Should I Contour For An Older Look?
Contouring the cheekbones, jawline, and temples can help to lift and sculpt the face, creating a more youthful appearance.
How Can I Avoid Cakey Or Heavy-Looking Contour On Mature Skin?
Using a light hand and blending well are key to avoiding a cakey or heavy-looking contour on mature skin. Build up the product gradually for a natural look.
Can Contouring Make My Wrinkles More Visible?
Contouring done properly can actually minimize the appearance of wrinkles by creating shadows that give the illusion of a smoother complexion.
Conclusion
Contouring older faces requires a tailored approach that enhances natural features while minimizing signs of aging. By using lighter shades to highlight areas like cheekbones and brow bones, and darker shades to create depth, you can achieve a more youthful appearance.
Remember to blend well and choose products suited to your skin type. With these techniques and a little practice, you can confidently contour your way to a radiant and age-defying look.